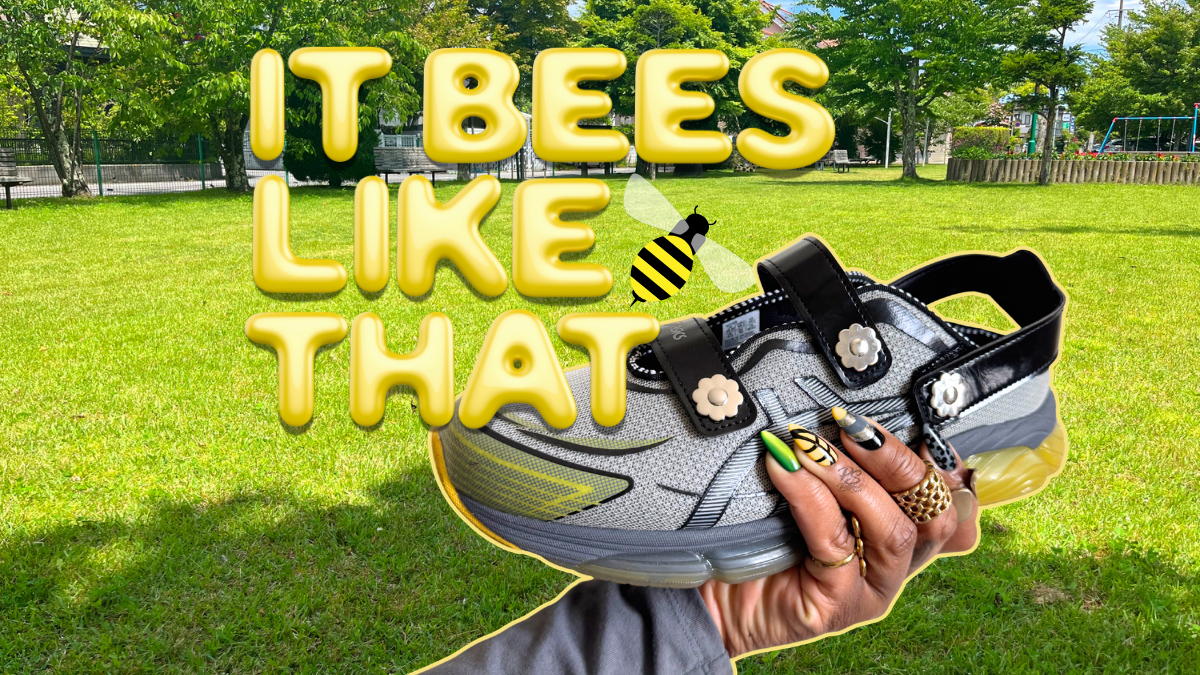
Surprise! Surprise! I have a new sneaker-inspired nail art set for y’all! You’re welcome.
For these DIY custom press-on nails, my source of inspiration was the Asics x Cecilie Bahnsen collaboration Gel Quantum 360 VIIIs in the Silver/Black colorway. They’re the perfect slip-on tomboy femme sneaker, and I’ve worn them dozens of times since I purchased them.
As I’m typing this, it’s an 80°F day in NYC…in early April, so I got these bee-utiful custom press-on nails on my hands at the right time. I had a lot of fun making this nail set, and I’m very pleased with how they turned out.
Let’s get into the nitty-gritty of the “It Bees Like That” at-home press-on nail set!

Whenever I create a custom press-on nail set, I go through my 6-step design process called The POLISH Method. Come on a design journey with me as I walk you through how I did these nails.
Point of View
After my last set (you can see them here), I wanted to go back to nail art that was a bit more complex. I didn’t have a particular color scheme or seasonal theme in mind for these nails; I just knew I wanted every nail to have a different design with different techniques used throughout the set.
Origin
One day, I needed to quickly throw on some shoes, and I just grabbed these Gel Quantum 360 VIIIs by Cecilie Bahnsen for Asics. Once I had them on, I immediately thought, “Oh, these would go so hard as inspo for my next nail art set!”
I didn’t look into Cecilie Bahnsen’s design story for these shoes, but after completing the set, I realized they were giving bumblebee vibes, hence the name.
Layout
If you’re a betting person, you can safely bet that 90% of the time you see me, my nails will be medium length, almond-shaped. With that said, I opted for my default layout, and it worked out well once I realized the sneakers that inspired these nails could be Bumblebee-inspired.
Inventory
The techniques I used for this nail art design weren’t too complicated, but I did pull out a couple of different products to execute this set.
When it comes to colors, I knew black would dominate this nail set, so every nail has black in it in some way. The only solid black bottled gel polish I have in my collection is the DND 888 – Master Black. I will say that you need at least 2 thin layers to get opacity with it, but that’s not an issue for me. For any line or dotting work, I reach for the Kokoist non-wipe Thick Black liner. It’s great for design work because it’s thick, so the designs stay in place.
For some fun and funky design elements, I used silver metallic chrome, silver chrome flat back studs, and my favorite glassy cateye from GAOY.
Sketch
Below is a picture of the sketch, aka “The Set Map” for this set.

There were 3 (or 4 if you count silver chrome) colors that I knew I was going to use in this set: black, gray, yellow, and silver chrome, so that made things a bit easier when it came time to sketch the designs. I decided to choose one specific design element from the sneaker for each nail to keep myself focused. I’ll explain each element in The Execution section so I can get into the nitty-gritty of the techniques.
Highlight & Harmonize
Making the color black a constant throughout this set immediately created harmony. I didn’t want a “hero” nail because I didn’t want any one to stand out over the others. Instead of a hero nail, I chose shine/reflection as the highlight for these nails. To create the shine/reflection, I went with cateye on the pinky, silver chrome on the middle finger, and silver studs on the thumb.
I also included a couple of yellow moments in this set to brighten it up a bit, and I think it came together rather nicely.
The Execution
As always, this is a gel polish nail art set. You could probably achieve this or a similar design with nail lacquer, but I opt for gel polish because it only dries once cured in a UV/LED lamp, so I’m free to wipe away any designs until I’m 100% pleased with how they look.
In the Nail by Nail section below, I’ll give you step-by-step instructions on how I achieved each design, but first, I want to talk about the designs on each nail.
Thumb – I chose to recreate the silver chrome flowers that are on the sneakers. I initially wanted to use chrome powder, but I opted for flatback chrome studs instead to add a 3D element to the set.
Index – The soles of these sneakers have a cute flower design that I wanted to include. I didn’t have a deep enough gray gel polish on hand, so I added a couple drops of DND 448 Snow Flake to DND 888 Master Black. I used a dotting tool and a liner brush to create the flowers, and then put a dot of gray in the center of each flower. I love this design because the flowers aren’t arranged in an organized way, so I could paint my heart away and not worry about the placement of the flowers being perfect.
Middle – I wanted one nail to have all of the colors on it, so we have a U-shaped band for each color for this nail art design. Now, here’s my issue with this design. I used the Kokoist Thick Black non-wipe liner gel under the silver chrome because it’s non-wipe, so I was able to rub in the chrome powder directly without adding a clear top coat. The problem here is that the liner gel is so thick and doesn’t really self-level, so there is so much unwanted texture. I need to find a good non-wipe black bottled gel polish soon!
Ring – The sneakers only have pops of yellow, but I still wanted to highlight that color a bit, so I opted for a solid yellow background and a large black design. I think the Asics logo is cool and not super obvious like the Nike check, so I used it as inspiration. I didn’t recreate the logo perfectly, but I think it’s close enough, no?
Pinky – Okay, while I love every nail in this set equally, this pinky is going to be the foundation for a future full nail set. At the toes of the sneakers, there’s a sheer yellow rubber over black fabric. I wanted to mimic that look, so I did a solid black gel polish, glassy magnet gel/cateye over that, and then a highlighter yellow jelly gel polish over that. This combination looks more green than yellow in most light, but IDC, IDC, IDC… I love it so much!
Let’s get into the step-by-step instructions.
Nail by Nail

First up, prep: buff and etch the nails!
I etch the underside of each nail using an e-file to help create a rough surface area so that the nails stay on for at least 2 weeks once applied. I then buff the top of each nail to ensure the gel polish does not peel off.
For this set, both hands mirror each other, but each individual finger has its own design, so I approached the design execution differently.

Thumb:
- Clear base coat, 1 coat, cure
- Solid black polish all over nail, 2 coats, cure between each coat
- Magnet gel polish all over nail, 1 coat, use magnet to create desired pattern, cure
- Jelly black polish all over nail, 2 coats, cure between each coat
- Clear builder gel, 1 coat, cure
- Apply flat-back chrome studs using rhinestone UV/LED cured gel
- Place a large dot of gel glue where the studs will go
- Using tweezers, place studs over the gel glue in a flower pattern
- Fully cure
- Neatly apply more gel glue on and around the pearls to secure them in place
- Fully cure
- Glossy top coat, 1 coat, cure

Index:
- Clear base coat, 1 coat, cure
- Solid gray polish all over nail, 2 coats, cure between each coat
- Matte top coat, 1 coat, cure
- Create black flower design with black gel liner and dotting tool, cure
- Using dotting tool, place a dot of gray polish in the center of each flower design, cure
- Clear builder gel, 1 coat, cure
- Glossy top coat, 1 coat, cure
Middle:
- Clear base coat, 1 coat, cure
- Matte top coat, 1 coat, cure
- Paint middle-top and middle-bottom “U”-shaped designs with non-wipe black gel liner, cure
- Rub in silver chrome powder over the black “U”-shaped designs, brush away excess chrome powder
- Clear base coat all over nail, 1 coat, cure
- Paint tip of nail (clear space over chrome design) with yellow gel polish, 2 coats, cure between each coat
- Paint “U”-shape in between chrome designs with gray gel polish, 2 coats, cure between each coat
- Paint bottom “U”-shape (clear space under bottom chrome design) with solid black polish, 2 coats, cure between each coat
- Clear builder gel, 1 coat, cure
- Glossy top coat, 1 coat, cure
Ring:
- Clear base coat, 1 coat, cure
- Solid yellow polish all over nail, 2 coats, cure between each coat
- Matte top coat, 1 coat, cure
- Paint black curved check design with solid black gel polish, 2 coats, cure between each coat
- Clear builder gel, 1 coat, cure
- Glossy top coat, 1 coat, cure
Pinky:
- Clear base coat, 1 coat, cure
- Solid black polish all over nail, 2 coats, cure between each coat
- Magnet gel polish all over nail, 1 coat, use magnet to create desired pattern, cure
- Jelly neon yellow polish all over nail, 2 coats, cure between each coat
- Clear builder gel, 1 coat, cure
- Glossy top coat, 1 coat, cure
Here are a few more tips I think are non-negotiables:
- Always follow the curing instructions based on the safety guidelines for each specific product.
- Use an appropriate UV/LED lamp – at least 48W. Those handheld flashlight ones and tiny 1-nail-at-a-time lamps do not completely cure gel polishes.
- Wear nitrile gloves at all times when handling gel products!
Here’s a step I never skip when making homemade press-on nails:
After each set is done, even when the non-wipe top coat is fully cured, there is likely some residue left on the press-on nails. So I do the following:
- Wipe each nail with a lint-free wipe dampened with 70% isopropyl alcohol.
- Follow with a second lint-free wipe dampened with water and a drop of Dawn dish soap.
- Finish with one final wipe using 70% isopropyl alcohol to ensure any residual inhibition layer is completely removed.
This gives me peace of mind that any residual inhibition layers are completely wiped off.
The Toolkit
Now that you know how I created this nail art, let me fill you in on the products I used. It looks like a ton of stuff, but relax, boo. Most of these items are things you buy once or a couple of times a year. They’re mostly items you likely already have in your DIY Press-On Nail Starter Kit.
Base & Prep:
- Full cover gel nail tips
- Nail stands
- Adhesives to secure the tips to the stand
- Disposable pads to cover the working area
- Nail Drill/E-file
- Nail drill bits
- Nail buffer blocks
- 70% Isopropyl alcohol
- Push-top container for alcohol
- Lint-free wipes
- UV/LED lamp
- Clear base coat
- Matte top coat (to layer underneath design work)
- Clear builder gel
- Nitrile gloves
Colors:
- Solid black – DND 888 Master Black
- Jelly black – Major Dijit #06 (from this set)
- Solid yellow – DND 204 Marigold
- Jelly neon yellow – Gelcare Highlighter Yellow
- Gray – DND 888 Master Black + drops of DND 448 Snow Flake
Finishes & Effects:
- Magnet/cateye gel polish
- Silver Mirror Chrome Powder
- Flatback silver chrome studs
- Rhinestone gel glue
- Matte top coat (for layers in between design)
Tools:
- Magnet for cateye gel polish
- Eyeshadow applicators (for rubbing in chrome powder)
- Foundation brush (for brushing away excess chrome powder)
- Dotting tool
- Liner brushes
- Color mixing palette
- UV/LED lamp
Top Coat:
