
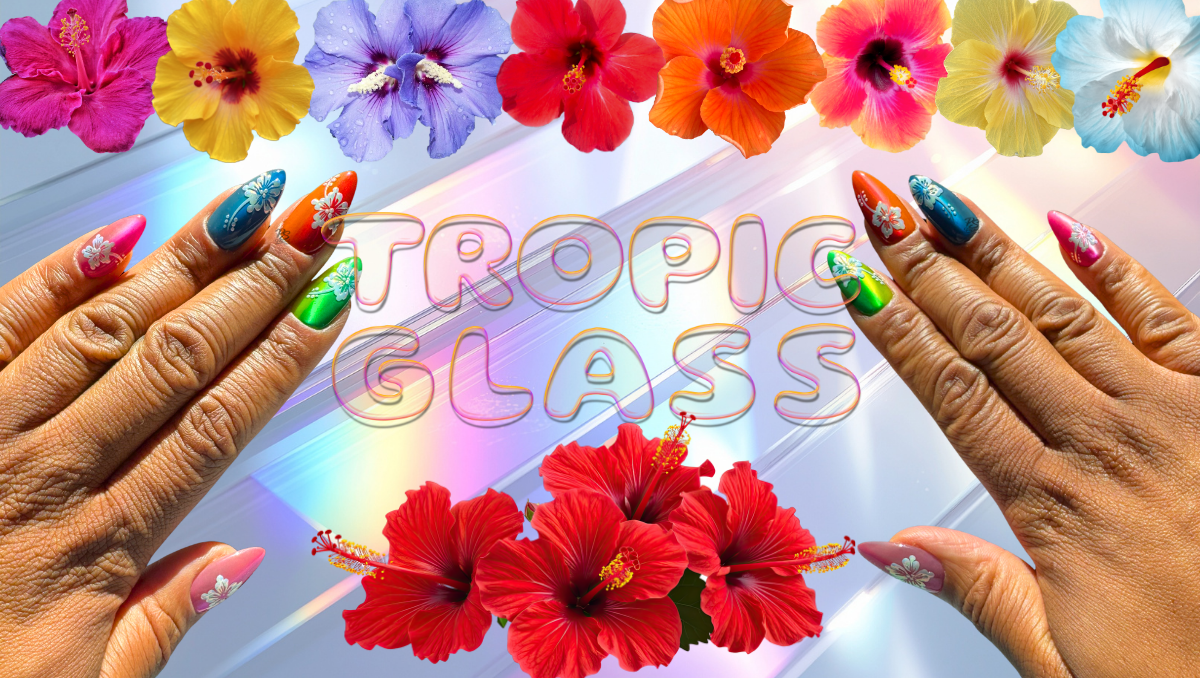
What do you do when you need to create DIY press-ons but have no idea what design to do? You become your own inspo and recreate an old set! That’s exactly what I did for this glass nail art set, featuring hibiscus flowers, which is why I’ve titled this a “Re-Set Story”.
Let’s get into the details of how I copied myself and took this redo nail set up a notch!

The Vision
Even though this set was a recreation of one I created when I first started making press-on nails at home, my 6-step design process, called The POLISH Method, was still incredibly useful. I only had a picture of my old set to reference, so going through The POLISH Method helped me to figure out what direction I wanted to take with this set as I was designing it.
Point of View
It’s still very much summer in NYC, so I had to keep the bright colors in my manicure. That was really the only design note I had for myself. Funky, simple, abstract, etc. were all directions I could have gone in, but I wasn’t married to a particular idea until I landed on my inspiration.
Origin
Similar to what I did with the Gimme Flowers set, I was my own inspiration this time. I really wanted to elevate this recreation and fix what I didn’t love about it the first time around. I was proud of the inspo set when I originally did it, but after a few years of nailing down my nail art techniques, I know I could make it at least 90% better.

Layout
Although the old set was short and square, I don’t do short nails at all anymore, and I knew one of the ways to truly elevate this set was to go medium, almond shape this go-round. I like to keep sharp-edge nails like square and coffin for my edgiest custom press-on sets and I wanted this set to give “soft life”.
Inventory
Besides the non-wipe potted white gel polish I used to paint the flowers, all of the colors I used were jelly colors, which along with the fine particle magnet gel, helped me achieve the glass nail art look. When I do a color magnet gel nail design, I typically use a solid color gel polish right above the clear base layer for maximum color impact, but I didn’t want to do that this time because I was doing a jelly ombre look on each nail. While I didn’t want to use solid colors, I knew I had to have a base color directly underneath the magnet gel so that my natural nail wouldn’t show through the press-on nail, so I used a nude pat gel as a nail concealer. I wasn’t sure how well this technique would work, so I tested it out first to compare the pat gel concealer method versus using a solid color gel polish. Take a look:

As you can see, I still got great color payoff with the pat gel concealer technique, so I saved myself some time and went with that method.
Sketch
Check out The Set Map for this custom DIY press-on nail set:

The sketch came in handy because I was able to track which colors I was using on each nail. I also saved myself some time by deciding on the placement of the hibiscus flower design on each nail.
Highlight & Harmonize
In the first version of this nail design, I painted multiple hibiscus flowers on each nail. That was cute, but to truly highlight that design element and elevate this nail set, I stuck to one flower per finger, but I made the flower much bigger and I added an iridescent chrome on top to make it shine. I loved how that turned out and I think bigger and bolder may be a design philosophy I start adhering to going forward.
The Execution
As with all of my other custom at-home press-on nail sets, this set was created with gel polish. It might be possible to recreate this with nail lacquer, but I suspect it might be more tedious and there’s a lot less room for error since lacquer starts drying as soon as you pull the brush out of the bottle. With gel polish, if at first you don’t succeed, wipe the design off and try it again, then cure once you’re satisfied.
As I mentioned in The Vision section, the goal with this set is to elevate the design above what I originally created a few years ago. I wanted to prove to myself that I am actually getting better, not just with design execution, but with ideation and creativity as well.
The two main design elements I used to elevate this glass nail art design were 1) my favorite glass-finish magnet gel from GAOY and 2) a chrome from my favorite chrome powder set from Ice Gel. I do want to give a shoutout to this GAOY matte top coat, because I was able to achieve a flawless isolated chrome design with a thin layer of it underneath the Kokoist Non Wipe Color Gel Thick White potted gel. Typically, to get a clean isolated chrome design, I use another matte top coat and then buff the entire nail, but with the GAOY matte top coat, I was able to skip the buffing step entirely and it saved me so much time!
Now that I’ve given some context into my thought process behind the ideation and execution of this set, let me tell you how I made these: nail-by-nail.
Nail by Nail

First up, prep: buff and etch the nails!
I etch the underside of each nail with an e-file to create a rough surface so the nails stay on for at least 2 weeks after application. I then buff the top of each nail to ensure the gel polish does not peel off.
There wasn’t much variation within this set, so each nail design was achieved in the same way.
Continue reading for the step-by-step tutorial on how I achieved this glass nail art design.
All Five Nails:
- Clear base coat, 1 coat, fully cure
- Using a silicone tip tool or small square sponge + handle*, pick up a about ¼ pea-size of nude pat gel and tap it into the nail until the entire nail is covered, fully cure
- If you can still see the embossed nail size on the underside of the full cover gel tip, add a bit more product and repeat the process. When done correctly, you shouldn’t be able to clearly see the nail size from the convex side of the tip.
- Magnet gel polish all over nail, 1 coat, use magnet to create desired pattern, fully cure
- Apply the darker jelly color to either the right of left half of the nail, do not cure
- Apply to lighter jelly color to the other side of the nail, do not cure
- Using an ombre brush, blend the two colors only where they meet in the middle of the nail to create an ombre effect, fully cure
- Repeat steps 4-6 until you achieve the level of color saturation you’re happy with
- Chrome-proof matte top coat all over nail, 1 coat, fully cure
- Using a dotting tool and a liner brush, paint the hibiscus flower design with non-wipe white polish, fully cure
- Watch this tutorial for tips on how to create the hibiscus flower design
- Rub in chrome powder over the hibiscus flower design, brush away excess chrome powder
- Clear top coat all over nail, 1 thin coat, fully cure
- Clear builder gel, 1 coat, fully cure
- Glossy top coat, 1 coat, fully cure
Here are a few more tips I think are non-negotiables:
- Always follow the curing instructions based on the safety guidelines for each specific product.
- Use an appropriate UV/LED lamp – at least 48W. Those handheld flashlight ones and tiny 1-nail-at-a-time lamps do not completely cure gel polishes.
- Wear nitrile gloves at all times when handling gel products!
Here’s a step I never skip when making homemade press-on nails:
After each set is done, even when the non-wipe top coat is fully cured, there is likely some residue left on the press-on nails. So I do the following:
- Wipe each nail with a lint-free wipe dampened with 70% isopropyl alcohol.
- Follow with a second lint-free wipe dampened with water and a drop of Dawn dish soap.
- Finish with one final wipe using 70% isopropyl alcohol to ensure any residual inhibition layer is completely removed.
This gives me peace of mind that any residual inhibition layers are completely wiped off.
The Toolkit
Now that you know how I did this set, I’ll fill you in on all of the products I used below.
I know it looks like a lot of stuff (especially in the Base & Prep list), but most of these things are items you buy just once or a couple of times a year. They’re mostly items you likely already have in your DIY Press-on Nail Starter Kit.
Base & Prep:
- Full cover gel nail tips
- Nail stands
- Adhesives to secure the tips to the stand
- Disposable pads to cover the working area
- Nail Drill/E-file
- Nail drill bits
- Nail buffer blocks
- 70% Isopropyl alcohol
- Push-top container for alcohol
- Lint-free wipes
- Clear base coat
- Matte top coat (to layer underneath design work)
- Clear builder gel
- Nitrile gloves
Colors:
- Deep jelly purple – equal parts Gelcare Jellyfish Blue + Gelcare Cherry Jello
- Light jelly purple – #7 from this Major Dijit gel polish set
- Dark jelly green – Gelcare Lightsaber Green
- Light jelly yellow/green – Gelcare Highlighter Yellow
- Jelly red – #1 from this Major Dijit gel polish set
- Jelly orange – Gelcare Lava Orange
- Dark jelly blue – Gelcare Jellyfish Blue
- Light jelly blue – Allure 113 from this set (I purchased this in person at Rita Nail Supply in the Bronx, NYC)
- Dark jelly pink – Gelcare Jelly Pink
- Light jelly pink – #12 from this Major Dijit gel polish set
Finishes & Effects:
- Nude pat gel
- Glass-like magnet gel polish
- Non-wipe white gel polish – Kokoist ML-01 Markers Line Non Wipe Color Gel Thick White
- GW-18 Maldives Sunset from this Ice Gel chrome powder set
- Chrome-proof matte top coat
Tools:
- Small square sponges + handle (for pat gel if your pat gel doesn’t come with a tool)
- Magnet for cateye gel polish
- Eyeshadow applicators (for rubbing in chrome powder)
- Foundation brush (for brushing away excess chrome powder)
- Liner brushes
- Dotting tool
- UV/LED lamp
Top Coat:
