
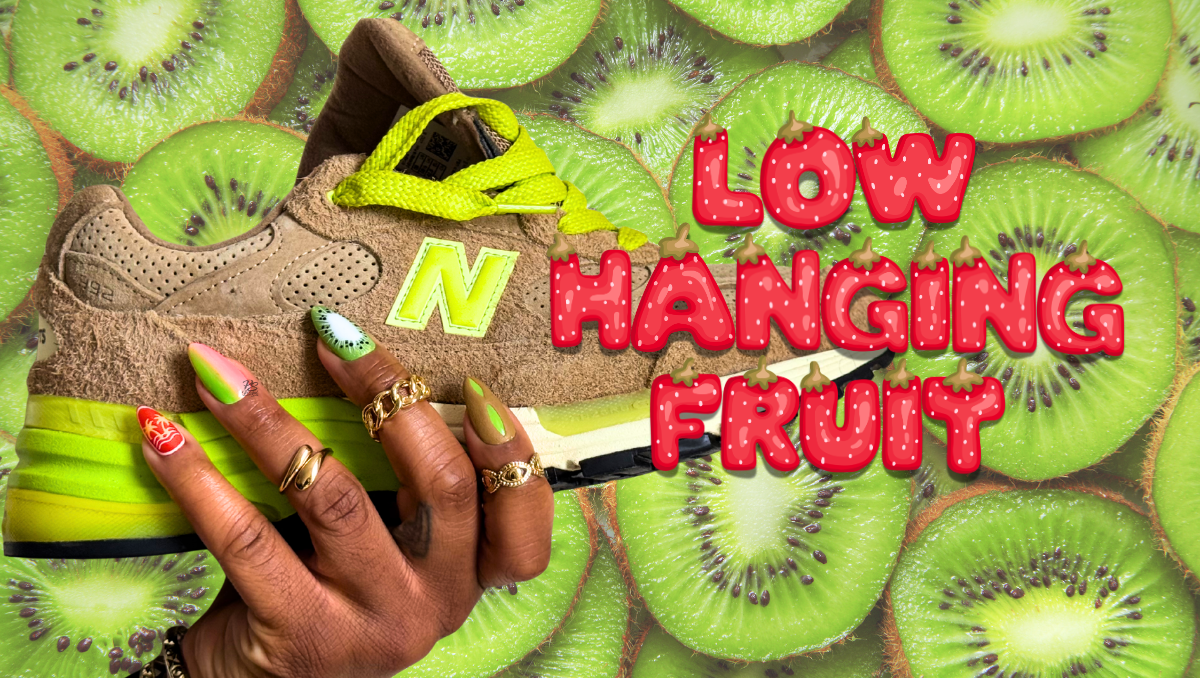
Calling all of my sneaker lovers with pretty nails! I’m finally back with some sneaker-inspired nail art. I went to the bottom of my closet to get inspiration for this set, not because I don’t love these sneakers, but because when I first bought them, I wore them so much they kinda became my beaters.
No long story necessary up front. Let’s get into how I created these DIY fruit-inspired nail art press-ons inspired by the Concepts x New Balance “Low Hanging Fruit” 992s.

The Vision
When designing any of my custom at-home nail sets, I always use my 6-step design process called The POLISH Method. The POLISH Method helps me think through the creative process in a way that minimizes analysis paralysis and leaves me with a set I love once that last layer of polish is cured.
Point of View
Coming off the very bright and botanical Tropic Glass set, I wanted to keep that vibe going strong. I didn’t really want to lean into a design that was too funky or abstract, but I did want to go heavy on the fun. I think this fruit-inspired nail art set achieved that.
Origin
I pulled out the Concepts x New Balance 992 “Low Hanging Fruit” collab as the inspiration for this sneaker-inspired nail art set. Now, there are really only three colors on the outer part of the shoe: tan, green, and cream. At first glance, you may think the shoe design is based just on the kiwi fruit (especially with the fuzzy suede texture). It’s when you look into the shoe and at the box that you see this was a strawberry-kiwi sneaker all along. Strawberries and kiwis are the fruits I eat the most, so I feel like I’m paying homage to some of my dietary homies with these fruit-inspired nail art press-ons.

Layout
Two words: medium, almond. That’s my tried and true nail shape and I stuck with it for this press-on nail set. Also, because this is a fruit-inspired nail set the almond shape was the best fit as it’s most similar to the form of kiwis and strawberries.
Inventory
All of my color inspo was from the shoe and the box so I stuck with red, green, tan, and pops of white, black, and yellow. For the index finger, I pulled out clear acrylic powder for some added texture and for my favorite finish of this set, the thumbs, I used Poke base gel for a wet look. I’m so in love with how it turned out, my next set will be a full wet look.
Sketch
Take a look at The Set Map for this custom DIY press-on nail set:

Getting my thoughts out on paper is always helpful for me. The Set Map gives me something to reference once I start to execute the set, and when things don’t work out well, it’s a way for me to document design updates and pivots I had to make while creating my press-ons.
Highlight & Harmonize
One of the reasons I love creating sneaker-inspired nail sets in the bulk of the design process is already done by the shoe’s designers. They put in a lot of work to make sure the color story and the texture elements all make sense together. Because of that, I’m never truly worried about harmony in these designs, but I do get to choose what I want to highlight. For this set, the hero nails are the middle fingers which most clearly represent the kiwi and strawberry. I love both nails, but the kiwi nail is my favorite of the two!
The Execution

As always, this is a gel polish nail art set. You could probably achieve this or a similar design with nail lacquer, but I opt for gel polish because it only dries once cured in a UV/LED lamp, so I’m free to wipe away any designs until I’m 100% pleased with how they look.
I used a few techniques that I tap into quite often when doing nail art: magnet gel, clear acrylic powder, and ombre. The one that gave me some trouble this time was ombre. If I’m being honest (and I’m always honest with y’all), ombre nail art in all of its forms gives me a bit of trouble every time I attempt it. I’m still working on getting a seamless blend between two colors, but my issue this time was color saturation.
For the ring fingers, I wanted to recreate the green-red ombre letters on the shoebox. I started off by using eyeshadows because I find I get the best blend with that product, but the color payoff wasn’t great. After adding a base coat layer over the eyeshadow to help prevent lifting, I decided to pull out a jelly green and jelly red gel polishes and went over the eyeshadow ombre with gel polish ombre. This worked perfectly and I think I might start doing the eyeshadow layer + jelly gel polish layer when I want a smooth, but bold ombre effect.
Okay, let’s get into the nail-by-nail of it all as I walk you through how I created each nail in this set.
Nail by Nail

First up, prep: buff and etch the nails!
I etch the underside of each nail with an e-file to create a rough surface so the nails stay on for at least 2 weeks after application. I then buff the top of each nail to ensure the gel polish does not peel off.
For this set, both hands mostly mirror each other (the middle fingers are the exception), but each individual finger has its own design, so I approached the design execution differently.

Thumb:
- Clear base coat, 1 coat, fully cure
- Solid color polish all over nail (red or green), 2 coats, fully cure between each coat
- Magnet gel polish all over nail, 1 coat, use magnet to create desired pattern, fully cure between each coat
- Jelly color polish all over nail (red or green), 2 coats, fully cure between each coat
- Clear builder gel, 1 coat, fully cure
- Glossy top coat, 1 coat, fully cure
- In hindsight, this step wasn’t necessary, but I decided to do the “wet” nail look after I had already added the top coat
- Poke base gel all over nail, 1 coat, fully cure
- Lightly jab glossy top coat randomly all around the nail to create a patchy look, watch the polish beads move and fully cure as soon as you see your desired look
- This TikTok shows this technique in action.
Index:
- Clear base coat, 1 coat, fully cure
- Solid light green gel polish all over nail, 2 coats, fully cure between each coat
- Clear builder gel, 1 coat, fully cure
- Glossy top coat, 1 coat, fully cure
- Paint tan gel polish design, 1 coat, fully cure
- Go over tan design with another coat of tan gel polish, do not cure
- Using a tiny scoop and focusing on the wet tan section; pour acrylic powder over the nail until the tan polish no longer looks shiny, fully cure

Middle:
- Clear base coat, 1 coat, fully cure
- Solid light green gel polish all over nail, 2 coats, fully cure between each coat
- Magnet gel polish all over nail, 1 coat, use magnet to create desired pattern, fully cure between each coat
- Matte top coat all over nail, 1 coat, fully cure
- Create fruit designs with liner brush and design-specific color gel polishes, flash cure as you go and fully cure once full design is complete
- Clear builder gel, 1 coat, fully cure
- Glossy top coat, 1 coat, fully cure
Ring:
- Clear base coat, 1 coat, cure
- Solid white gel polish all over the nail, 2 coats, fully cure between each coat
- Matte top coat, 1 coat, fully cure
- Using an eyeshadow applicator sponge, apply bright green on the left/right side of the nail and red eyeshadow on the other side of the nail, be sure no white polish is visible on the nail
- Using a lint-free wipe with a little bit of 70% isopropyl alcohol on it, wipe just the border of the entire nail, just along the edge as to not disturb the eyeshadow
- Clear base coat, 1 coat, fully cure
- Apply jelly red and jelly neon green gel polishes over the corresponding eyeshadow colors, do not cure
- Using an ombre brush, blend the two colors only where they meet in the middle of the nail to create an ombre effect, fully cure
- Clear builder, 1 coat, fully cure
- Glossy top coat, 1 coat, fully cure
Pinky:
- Clear base coat, 1 coat, fully cure
- Solid red polish all over nail, 2 coats, fully cure between each coat
- Matte top coat, 1 coat, fully cure
- Using liner brushes, paint on design, flash cure as you go and fully cure once full design is complete
- Clear builder gel , 1 coat, fully cure
- Glossy top coat,1 coat, fully cure
Here are a few more tips I think are non-negotiables:
- Always follow the curing instructions based on the safety guidelines for each specific product.
- Use an appropriate UV/LED lamp – at least 48W. Those handheld flashlight ones and tiny 1-nail-at-a-time lamps do not completely cure gel polishes.
- Wear nitrile gloves at all times when handling gel products!
Here’s a step I never skip when making homemade press-on nails:
After each set is done, even when the non-wipe top coat is fully cured, there is likely some residue left on the press-on nails. So I do the following:
- Wipe each nail with a lint-free wipe dampened with 70% isopropyl alcohol.
- Follow with a second lint-free wipe dampened with water and a drop of Dawn dish soap.
- Finish with one final wipe using 70% isopropyl alcohol to ensure any residual inhibition layer is completely removed.
This gives me peace of mind that any residual inhibition layers are completely wiped off.
The Toolkit
It’s time for me to give you details on all of the products I used to create this set. I beg you, don’t get overwhelmed by this list. It looks like way too much stuff, but most of these things are items you buy just once or a couple of times a year. They’re mostly items you likely already have in your DIY Press-on Nail Starter Kit.
Base & Prep:
- Full cover gel nail tips
- Nail stands
- Adhesives to secure the tips to the stand
- Disposable pads to cover the working area
- Nail Drill/E-file
- Nail drill bits
- Nail buffer blocks
- 70% Isopropyl alcohol
- Push-top container for alcohol
- Lint-free wipes
- Clear base coat
- Matte top coat (to layer underneath design work)
- Clear builder gel
- Nitrile gloves
Colors:
- Red – PLA-109 Christmas Magic
- Jelly red – #1 from this Major Dijit gel polish set
- Solid light green – DND 2521 Quantum Leap
- Jelly light green – Born Pretty SG-02 from this set
- Tan – Lanfo C86 (discontinued)
- Yellow – DND 204 Marigold DIVA
- White – PLA-289 French White
- Deep green (for leaves) – DND 252 Zen Oasis
- Jelly neon green – Gelcare Highlight Yellow + Gelcare Lightsaber Green
- Eyeshadow green and red from this eyeshadow palette
- White liner – Kokoist E-1 Maxi White
- Black liner – Kokoist E-2 Maxi Black
Finishes & Effects:
Tools:
- Liner brushes
- Metal cuticle pusher (tiny scoop for acrylic powder)
- UV/LED lamp
- Magnet for cateye gel polish
- Eyeshadow applicators (for rubbing in eyeshadow)
Top Coat:
