Happy belated Mother’s Day to all the mothers, moms, mommies, muvas, and mamas – this graffiti art-inspired press-on nail set is for you!
My last few nail sets have been sneaker-inspired, so I wanted to try something different. These nails are colorful, bold, and very much give “‘round the way” mom, and I’m here for it.
Okay, no need for a long introduction. I want to get into how I achieved this graffiti letter nail art design!

The Vision
As with all of my DIY custom press-on nail sets, I work through “The Vision” using my 6-step design process called The POLISH Method. Allow me to walk you through the process now.
Point of View
I knew I’d have these nails on for Mother’s Day, so the theme was already set for me. I love being my kid’s mother, and I wanted to celebrate that part of me. I could’ve done a typical nail design with tons of flowers and light pinks with butter yellows, but if I’m keeping it real with y’all, that’s not my style. I’m a tomboy femme mom. My son’s father wishes he could dress like me. Pastels for Mother’s Day are cute, but I had to keep it vibey and edgy so it really felt like me.
Origin
If I was going to have a nail design that leaned into my personal style without relying on a pair of sneakers for inspiration, I couldn’t turn to my closet for design ideas. So I did what most nail DIYers do and did a little Pinterest scroll. Can you guess what stopped my scroll? A short video tutorial on how to draw graffiti-style letters. I knew instantly that I wanted to try to paint graffiti letters onto my press-on nails. The creator is TG Design (@thingraff) on TikTok. I scrolled through his page and found tutorials for the letters “M” and “A” that I loved because I wanted the word on my nails to be “MAMA”. I used those videos to create the nail art for this DIY press-on nail set.
Layout
Get excited, friends! I did a different nail shape this time! The medium almond nails will be back soon, but I opted for medium square this time for two reasons. First, I wanted as much surface area as possible to work with to paint on big, graffiti letters without having to accommodate a tapered tip. Second, when I think of graffiti, a rectangular surface typically serves as the background for the art – side of a building, train car, shipping container, etc. Square was the perfect layout for this design.
Inventory
This set needed to be pretty bold, so I pulled out some of the brightest colors in my collection. I wanted these nails to shine and sparkle in the sunlight, and since I rarely use glitter polishes, I pulled out my old faithful for the background of the design– a satin magnet gel. I used just one magnet gel, GAOY 2341, creating different background colors for each nail by sandwiching it between a solid and jelly color. ThinGraff sometimes creates a cloud/bubble effect around the graffiti letters he draws, but I wasn’t sure I’d have enough space on the nails to recreate that look, so instead, I added clear, flatback pearls for some texture and a 3D effect. I also grabbed a few more pearls and gems for the crown design on the thumbs
Sketch
For this set, I sketched out the design using “The Set Map” template I created, but I also had to grab any additional piece of paper to decide on my color combinations.

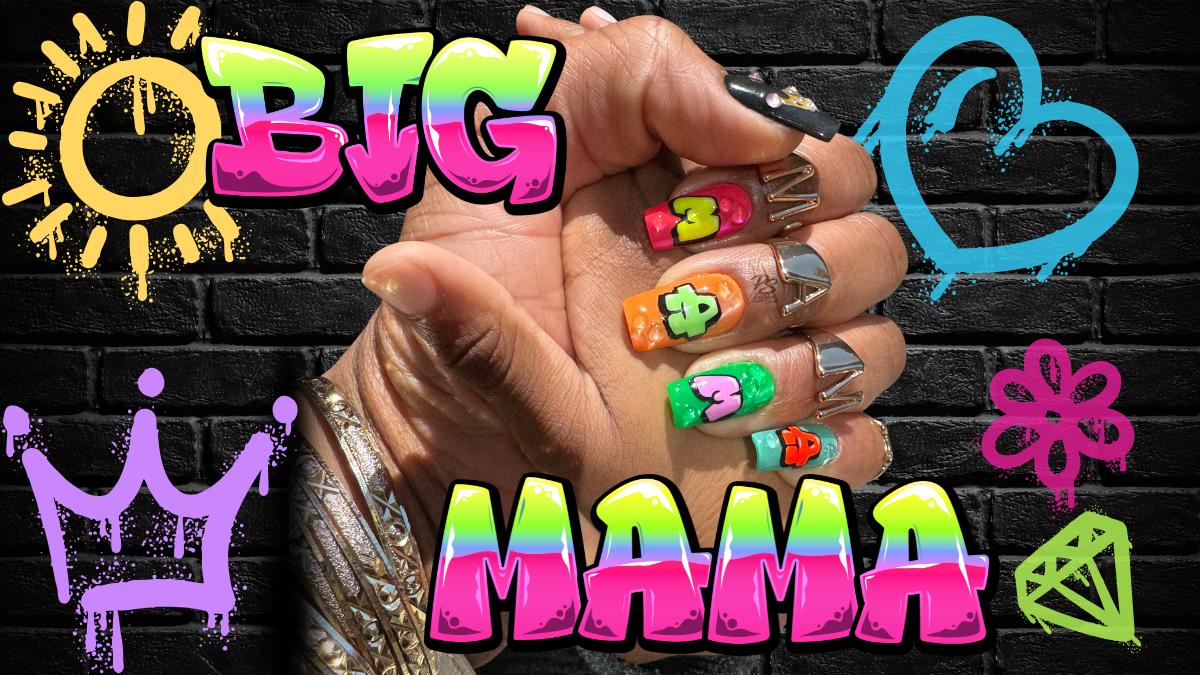
Sketching out the design was extremely important for me while designing these graffiti art-inspired nails because I’ve never drawn graffiti anything before. I needed to practice on paper first to check that I’d be able to follow ThinGraff’s tutorials well. I did pretty okay, if I do say so myself!I also needed The Set Map because I wanted to be sure that the set would spell out “MAMA” on both hands when I held my son’s hand – everybody say “awww!” And because the letters needed to be in a specific order, each hand wouldn’t mirror the other. For example, on my left hand, the index finger nail has an “M” painted on, but on my right hand, the index finger nail has an “A”.

I wanted every nail in this set to have a different color combination, which meant I pulled out a lot of polishes to get that right. I didn’t care about color theory; I just wanted to select color pairs that looked good to me. I wrote down all of the colors I wanted to use (solid backgrounds, sheer jelly colors, and colors for the letters) and then used the color pencil equivalent to do some color matching.
Highlight & Harmonize
This nail art design was pretty cohesive from the beginning. Since I was spelling out a word, all of the nails had to make sense together – except for the thumbs. Because “MAMA” is only four letters long and the thumbs don’t align with the rest of the fingers to be able to read a single word in a straight-ish line, I left them out of the graffiti letter conversation. But as this was a celebratory set, I thought I’d treat myself to a crown on each thumb as a nod to moms = queens. I did a simple three-pointed solid gold chrome crown with an adornment of rhinestones and pearls on each thumb.
The “hero” nail of the set highlighting the invisible crowns mothers wear – that feels right.
The Execution
This is a gel polish nail art set because I prefer gel polish over nail lacquer for nail art – especially for designs like this one that are more detailed. The main techniques used were hand-painting, cateye/magnet gel polish, and the addition of 3D elements such as pearls and gems. I’ll go into detail (with pictures!) about exactly how I hand-painted the graffiti letters in the next section.
Nail by Nail

First up, prep: buff and etch the nails!
I etch the underside of each nail using an e-file to help create a rough surface area so that the nails stay on for at least 2 weeks once applied. I then buff the top of each nail to ensure the gel polish does not peel off.
For this set, I created all the graffiti letter designs the same way; I just used different colors. I’ll give you step-by-step directions on how to do the letter design and then list the colors used for each nail in “The Toolkit” section. But before we get into the graffiti design, check out how I created the thumb crown design.

Thumb:
- Clear base coat, 1 coat, full cure
- Solid black gel polish, 2 coats, full cure between each coat
- Magnet gel polish all over the nail, 1 coat, use magnet to create desired pattern, full cure
- Jelly black gel polish, 2 coats, full cure between each coat
- Matte top coat, 1 coat, full cure
- Buff entire nail with mini buffer block, wipe away any excess dust
- Paint crown design with non-wipe white gel polish, 1 coat, full cure
- Rub in gold chrome powder over the crown design, brush away excess chrome powder
- Glossy top coat over entire nail, 1 coat, full cure
- Clear builder gel, 1 coat, full cure
- Apply flat-black pearls and gems using rhinestone UV/LED-cure gel
- Place a large dot of gel glue where the studs will go
- Using tweezers, place studs over the gel glue in the desired pattern
- Fully cure
- Neatly apply more gel glue on and around the pearls to secure them in place
- Fully cure
- Glossy top coat, 1 coat, fully cure
Index, Middle, Ring, and Pinky:
- Clear base coat, 1 coat, fully cure
- Solid color gel polish, 2 coats, fully cure
- Magnet gel polish all over the nail, 1 coat, use magnet to create desired pattern, full cure
- Jelly color gel polish, 2 coats, full cure between each coat
- Matte top coat, 1 coat, full cure
- Paint graffiti letter design (full instructions below), full cure
- Clear builder gel, 1 coat, full cure
- Apply flat-black pearls and gems using rhinestone UV/LED cured gel
- Place a large dot of gel glue where the studs will go
- Using tweezers, place studs over the gel glue in a flower pattern
- Fully cure
- Neatly apply more gel glue on and around the pearls to secure them in place
- Fully cure
- Glossy top coat, 1 coat, fully cure

Full breakdown of Step 6: Graffiti letter design
To create the graffiti letters, I followed two different tutorials by ThinGraff on TikTok: the letter “M” and the letter “A”. ThinGraff draws with markers on paper, so here are my steps on how to do it with gel polish on soft gel full cover tips.
- Write the letter in the center of the nail using a fine-tip permanent marker
- Now, outline that letter to create a “bubble-style” letter
- Outline the bubble letter with a short liner brush, then fill it in completely with thick white gel polish, full cure
- Paint over the white polish letter with the desired solid color gel polish, full cure
- Using a thin liner brush and thick black gel polish, paint the outline and shadows on the colored letter, full cure
- Paint on white highlights on the graffiti letter with a short, thin liner brush, full cure
Here are a few more tips I think are non-negotiables:
- Always follow the curing instructions based on the safety guidelines for each specific product.
- Use an appropriate UV/LED lamp – at least 48W. Those handheld flashlight ones and tiny 1-nail-at-a-time lamps do not completely cure gel polishes.
- Wear nitrile gloves at all times when handling gel products!
Here’s a step I never skip when making homemade press-on nails:
After each set is done, even when the non-wipe top coat is fully cured, there is likely some residue left on the press-on nails. So I do the following:
- Wipe each nail with a lint-free wipe dampened with 70% isopropyl alcohol.
- Follow with a second lint-free wipe dampened with water and a drop of Dawn dish soap.
- Finish with one final wipe using 70% isopropyl alcohol to ensure any residual inhibition layer is completely removed.
This gives me peace of mind that any residual inhibition layers are completely wiped off.
The Toolkit
Okay, now that you know how to create the design, I’ll fill you in on all of the products I used to create this graffiti art-inspired nail set. At first glance, this list looks daunting, but most of these things are items you buy just once or a couple of times a year. They’re mostly items you likely already have in your DIY Press-on Nail Starter Kit.
Base & Prep:
- Full cover gel nail tips
- Nail stands
- Adhesives to secure the tips to the stand
- Disposable pads to cover the working area
- Nail Drill/E-file
- Nail drill bits
- Nail buffer blocks
- 70% Isopropyl alcohol
- Push-top container for alcohol
- Lint-free wipes
- Clear base coat
- Matte top coat (to layer underneath design work)
- Clear builder gel
- Nitrile gloves
Colors:
Because each nail has a different color combination (excluding the thumbs), I’m going to list the colors I used per nail.
- Thumb:
- Solid black – DND 888 Master Black
- Jelly black – #6 from this Major Dijit gel polish set
- White gel polish for chrome base – Kokoist – Color Gel – Markers Line Non-Wipe Thick White
- For the other four fingers, I used the same black and white liner gels:
- White liner – Kokoist Maxi White
- Black liner – Kokoist Maxi Black
- Right Index:
- Solid purple – PLA 106 After Dark
- Jelly purple – #7 from this Major Dijit gel polish set
- Orange letter – DND 760 Russet Orange
- Right Middle:
- Solid neon yellow – DND 2518 Down With The Zest
- Jelly neon yellow – Gelcare Highlighter Yellow
- Teal letter – DND 669 Fierce Sapphire
- Right Ring:
- Solid blue – DND 436 Baby Blue
- Jelly blue – Allure 113 from this set (I purchased this in person at Rita Nail Supply in the Bronx, NYC)
- Pink letter – Kokoist Neon Toy Pink
- Right Pinky:
- Red-orange solid – DND 715 Island Punch
- Jelly red-orange – Gelcare Cherry Jello
- Peach letter – DND 185 Peach Cobbler DIVA
- Left Index:
- Solid pink – DND 231 Blazing Berry DIVA
- Jelly pink – Gelcare Jelly Pink
- Neon yellow letter – DND 122 Vitamin D DIVA
- Left Middle:
- Solid orange – PLA 79 Deal Me In
- Jelly orange – Allure 144 from this set (I purchased this in person at Rita Nail Supply in the Bronx, NYC)
- Neon green letter – DND 2520 Area 51
- Left Ring:
- Solid green – DND 2523 Garden Games
- Jelly green – Gelcare Lightsaber Green
- Purple letter – DND 542 Lovely Lavender
- Left Pinky:
- Solid teal – Lanfo C168 (color discontinued)
- Jelly teal – Allure 108 this set (I purchased this in person at Rita Nail Supply in the Bronx, NYC)
- Red-orange letter – Allure 102 this set (I purchased this in person at Rita Nail Supply in the Bronx, NYC)
Finishes & Effects:
- Magnet/cateye gel polish
- Gold Mirror Chrome Powder
- Flatback clear pearls
- White flatback pearls
- Rhinestones
- Rhinestone gel glue
- Matte top coat (for layers in between design)
Tools:
- Magnet for cateye gel polish
- Eyeshadow applicators (for rubbing in chrome powder)
- Foundation brush (for brushing away excess chrome powder)
- Liner brushes
- UV/LED lamp
- Ultra fine-tip permanent marker (for drawing graffiti letter outline)
Top Coat:
