
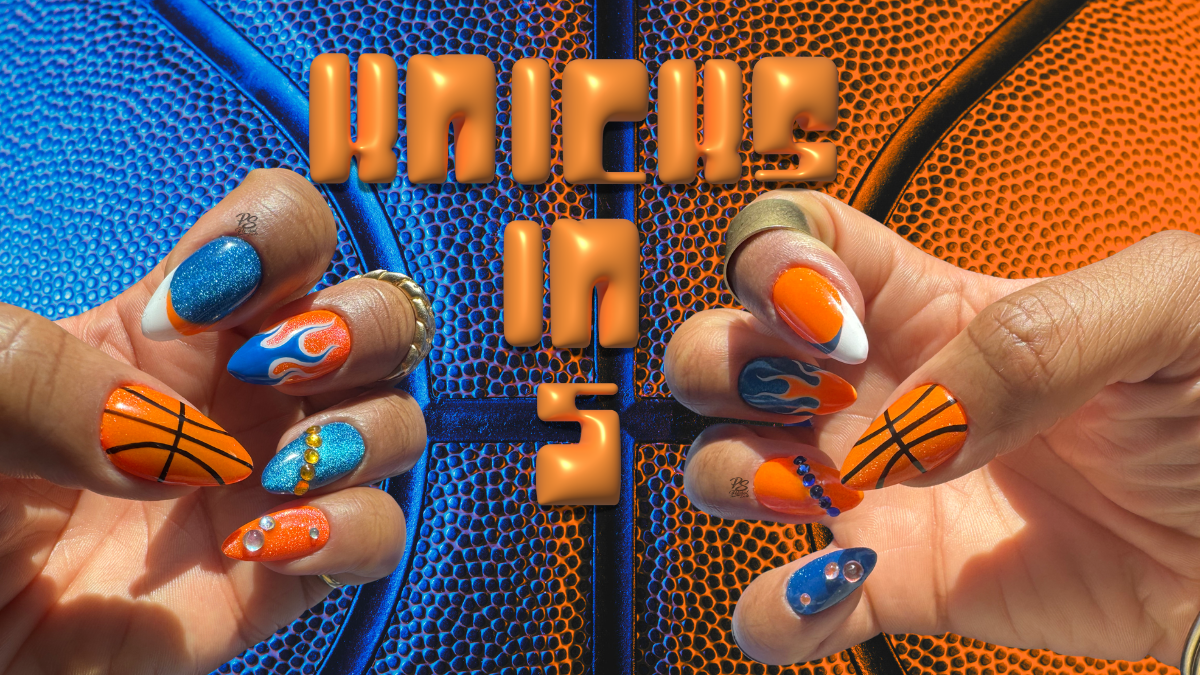
Go NY, Go NY, Go!!!
I created this NY Knicks nail art set to celebrate the team’s historic NBA championship run (and win)! I actually had a whole other set planned to wear during this time, but I knew that I’d regret not rocking a blue-and-orange set if the Knicks happened to win. I’m not super into professional sports, but I’m super into NYC, and as a bandwagon Knicks fan, this win means something to me!
Okay, let’s dive into how I created this at-home press-on nail set.

The Vision
As with all of my custom press-on nail sets, I go through my 6-step design process called The POLISH Method. I literally came up with this design while in the shower one day, so having this process down came in clutch like the Game 4 OG tip-in!
Point of View
The vibe of this set was “winning.” I knew immediately what I wanted to do, so the design came together fast. I wanted to give off champion vibes throughout the set.
Origin
The NYC Knicks – full stop. Do I even need to say more? Probably not, but here we are. After not making it to the NBA finals since 1999 (when I was actively watching pro basketball) and not winning a championship since 1973, the Knicks’ being in the finals in 2026 was a huge moment for NYC, and I wasn’t about to sit it out.
Layout
I stuck with my tried and true medium almond length nails for the shape of this set because I knew I wanted one nail to resemble a basketball, so I needed a roundish shape. Also, medium almond is just my favorite shape on me, so I can never go wrong with it.
Inventory
The Knicks colors are orange, blue, and white, so that’s the color scheme I went with for this DIY press-on nail set. Remember how I said I wanted this set to give off a “champion” vibe? To me, that meant I had to bring it sparkle, shine, and bling because winning “The Chip” means getting that ring. To bring in the bling, I opted for a more sparkly, almost glittery 9D magnet gel from DND and also added rhinestones to the design.
Sketch
Take a look at “The Set Map” for this nail art design below:

Sometimes I draw out random things when I’m sketching designs because I’m not 100% sure what I actually want to do. But as I mentioned before, I designed this set while in the shower, so when it was time to put pencil to paper, I already had a picture in my mind of what each nail would look like. Even though I knew what I wanted the design to be, and it was very simple, sketching it out helped me to keep all of the colors in order because I did reverse color designs on each hand.
Highlight & Harmonize
I don’t always have a “hero” nail in my at-home press-on nail sets, but I felt like the thumbs needed to set the tone this time. The Knicks colors in this nail set were an obvious signal of where my loyalty was in this championship series, but just in case someone wasn’t too sure, I included a full basketball design within the set. I often like for my middle or pinky nail to be the hero nail in a set, but my thumbs gave me the most surface area and the roundest shape, so they got to be centerstage for the basketball nail art this time.
The Execution
As with all of my press-on nails, this is a gel polish nail art set. Of course, it’s possible to recreate this design with nail lacquer, but I use gel polish because it doesn’t dry until cured under a UV/LED lamp, so I can wipe away any mistakes and redo designs until I’m 100% pleased with how everything looks.
The main technique I used in this set is magnet/cateye gel polish. It’s the one element that’s on every nail. While there are a lot of beautiful colored magnet gels on the market, I typically like to customize my magnet gel colors by using a sandwich technique.
I’ll give a detailed step-by-step breakdown on how I do this throughout the “Nail by Nail” section below, but I achieve custom magnet gel colors by layering polishes in the following order:
- Solid color gel polish (1-2 coats depending on the polish opacity)
- Silver magnet (typically 1 coat is enough to achieve the desired effect)
- Sheer/jelly gel polish (usually 1-2 coats and a similar color to the solid color gel polish underneath the magnet gel layer)
Let’s go through each nail art design nail by nail.
Nail by Nail

First up, prep: buff and etch the nails!
I etch the underside of each nail with an e-file to create a rough surface so the nails stay on for at least 2 weeks after application. I then buff the top of each nail to ensure the gel polish does not peel off.
For this set, both hands mirror each other, but each finger has its own design, so I approached the design execution differently. Also note that while both hands mirror each other, the colors are reversed. For example, on the right index finger, the main color in the design is orange, with blue and white as accent colors. On the left index finger, the main color of the design is blue, with orange and white being the accent colors.
Thumb (both hands):
- Clear base coat, 1 coat, fully cure
- Solid orange polish all over nail, 2 coats, fully cure between each coat
- Magnet gel polish all over nail, 1 coat, use magnet to create the desired pattern, fully cure
- Jelly orange polish all over nail, 2 coats, fully cure between each coat
- Matte top coat, 1 coat, fully cure
- Create the basketball design with black liner gel, fully cure
- Clear builder gel, 1 coat, fully cure
- Glossy top coat, 1 coat, fully cure
Right Index:
- Clear base coat, 1 coat, cure
- Solid orange polish all over nail, 2 coats, fully cure between each coat
- Magnet gel polish all over nail, 1 coat, use magnet to create the desired pattern, fully cure
- Jelly orange polish all over nail, 2 coats, fully cure between each coat
- Matte top coat, 1 coat, fully cure
- Create the diagonal half-French design with white gel polish, fully cure
- Create the other half of the diagonal French design with blue gel polish, fully cure
- Clear builder gel, 1 coat, fully cure
- Glossy top coat, 1 coat, fully cure
For the left index finger, follow the same steps for the right index, but swap out orange for blue and vice versa.
Right Middle:
- Clear base coat, 1 coat, fully cure
- Solid blue polish all over nail, 2 coats, fully cure
- Magnet gel polish all over nail, 1 coat, use magnet to create the desired pattern, fully cure
- Jelly blue polish all over nail, 2 coats, fully cure between each coat
- Matte top coat, 1 coat, fully cure
- Create the flame design with white gel liner, fully cure
- With orange gel polish, create a smaller flame design on top of white flame so that the white borders the orange flames, fully cure
- If necessary, clean up the white outline with white gel liner, fully cure
- Clear builder, 1 coat, fully cure
- Glossy top coat, 1 coat, fully cure
For the left middle finger, follow the same steps for the right middle, but swap out orange for blue and vice versa.
Right Ring:
- Clear base coat, 1 coat, cure
- Solid orange polish all over nail, 2 coats, cure between each coat
- Magnet gel polish all over nail, 1 coat, use magnet to create the desired pattern, fully cure
- Jelly orange polish all over nail, 2 coats, fully cure between each coat
- Clear builder gel, 1 coat, fully cure
- Clear builder gel, do not cure, using tweezers, place rhinestone gems in the desired pattern, fully cure
- Reinforce gems by neatly applying rhinestone gel glue around the gems, fully cure
- Glossy top coat, 1 coat, fully cure
For the left ring finger, follow the same steps for the right index, but swap out orange for blue and vice versa.
Right Pinky:
- Clear base coat, 1 coat, cure
- Solid blue polish all over nail, 2 coats, cure between each coat
- Magnet gel polish all over nail, 1 coat, use magnet to create the desired pattern, fully cure
- Jelly blue polish all over nail, 2 coats, fully cure between each coat
- Clear builder gel, 1 coat, fully cure
- Clear builder gel, do not cure, using tweezers, place flatback aurora pearls in the desired pattern, fully cure
- Reinforce aurora pearls by neatly applying rhinestone gel glue around the gems, fully cure
- Glossy top coat, 1 coat, fully cure
For the left pinky finger, follow the same steps for the right index, but swap out orange for blue and vice versa.
Here are a few more tips I think are non-negotiables:
- Always follow the curing instructions based on the safety guidelines for each specific product.
- Use an appropriate UV/LED lamp – at least 48W. Those handheld flashlight ones and tiny 1-nail-at-a-time lamps do not completely cure gel polishes.
- Wear nitrile gloves at all times when handling gel products!
Here’s a step I never skip when making homemade press-on nails:
After each set is done, even when the non-wipe top coat is fully cured, there is likely some residue left on the press-on nails. So I do the following:
- Wipe each nail with a lint-free wipe dampened with 70% isopropyl alcohol.
- Follow with a second lint-free wipe dampened with water and a drop of Dawn dish soap.
- Finish with one final wipe using 70% isopropyl alcohol to ensure any residual inhibition layer is completely removed.
This gives me peace of mind that any residual inhibition layers are completely wiped off.
The Toolkit
Now let’s get into all of the products I used to create this nail art design. I know it looks like a ton of stuff, but don’t worry. Most of these items are things you buy only once or a couple of times a year. They’re items you likely already have in your DIY Press-On Nail Starter Kit.
Base & Prep:
- Full cover gel nail tips
- Nail stands
- Adhesives to secure the tips to the stand
- Disposable pads to cover the working area
- Nail Drill/E-file
- Nail drill bits
- Nail buffer blocks
- 70% Isopropyl alcohol
- Push-top container for alcohol
- Lint-free wipes
- UV/LED lamp
- Clear base coat
- Matte top coat (to layer underneath design work)
- Clear builder gel
- Nitrile gloves
Colors:
- Solid orange – DND #713 Orange Sherbet
- Jelly orange – Gelcare Lava Orange
- Solid blue – DND #733 Heartbreak
- Jelly blue – Gelcare Jellyfish Blue
- White – PLA French White
- Black liner – Kokoist Maxi Black
- White liner – Kokoist Maxi White
Finishes & Effects:
- Magnet/cateye gel polish – DND 9D Cat Eye Smoothie #09 Silver Lynx
- Rhinestone gems
- Flatback aurora pearls
- Rhinestone gel glue
- Matte top coat (for layers in between design)
Tools:
- Magnet for cateye gel polish
- Liner brushes
- UV/LED lamp
- Tweezers for gems (a lot of gems come with tweezers, so you may not need to purchase these separately.)
Top Coat:
