
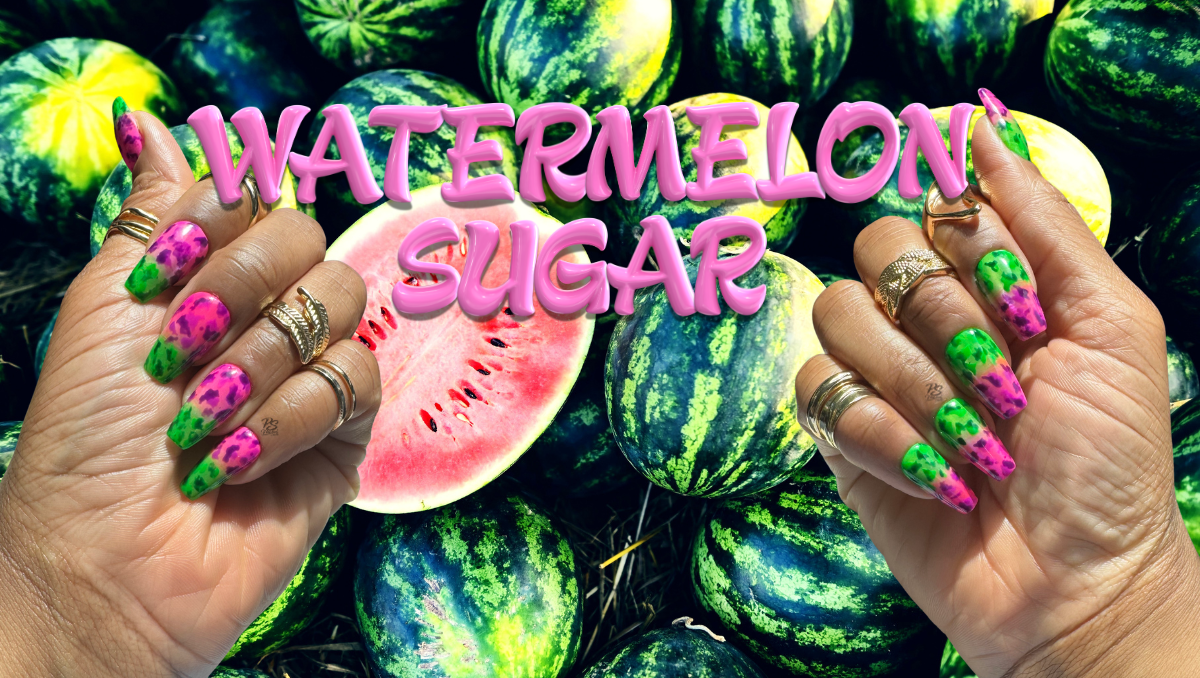
Every time I looked down at this custom DIY press-on nail set, the tune of “Watermelon Sugar” kept looping in my mind. The funny thing is that watermelons weren’t even the main inspiration for this set, but I just couldn’t unsee it.
This is a set that was inspired by some press-ons I did over a year ago, never wore, and wanted to recreate with a little more “ummph.”
Let’s get into the nitty-gritty of this watermelon tortoiseshell nail art design.

The Vision
To create this at-home press-on nail set, I walked myself through my 6-step design process, The POLISH Method. Check out the breakdown of how I thought through creating these nails below.
Point of View
After my graffiti-inspired nail set, I wanted to keep the bold and bright vibes going, but with easier-to-execute techniques. Whenever I want to give bold and bright, I immediately go for neon, so that’s what we’ve got going on with this set.
Origin

About a year ago, I created a royal blue tortoiseshell nail art set that was inspired by a pair of Elisa Johnson sunglasses I own and love. I cannot remember why I never actually wore that press-on nail set (I need to get on that!), but I did keep them in my press-on nail book. Since I wanted a neon look, it wasn’t the time to wear the blue nails, so I created a nail set that was the same, but different.
Layout
I know I keep telling you that medium almond is my favorite nail shape, but I actually switched things up this time and went with medium coffin! The inspo set was coffin-shaped, and I didn’t want to change up too many variables when recreating it. I also think coffin nails give a cool, edgy vibe, which is always something I’m down for.
One thing I need to say about these particular coffin nails: the bases of these full-cover gel tips were a bit too wide for my nail bed. Due to not feeling like it, I didn’t file the bases of these nails, and it was very obvious (to me) that they weren’t the best fit once I applied them. Not only did this look a bit “off”, but the press-on nails weren’t flush to my natural nails after I glued them on, so water got trapped, and I got greenies! Lesson learned.
Inventory
So I’ve already established that neon was the vibe, but why did I go for pink and green? Green is my absolute #1 color, but when I want to lean into the femme part of my tomboy femme look, I go for a cute (and usually neon) pink.
The technique I used to execute this nail art is the typical tortoise shell one, but I added a little “ummph” by adding a glassy magnet/cateye effect and ombre-ing the green and pink into each other. The magnet gel polish I reach for the most and use in this set is the GAOY 2341 because the particles are so fine, which creates a glassy and not shimmery effect.
Sketch
“The Set Map” for this custom press-on nail set is quite simple.

This nail art design isn’t too complex, so I didn’t spend a lot of time sketching it. Having the sketch was helpful, though, so I remembered which color I wanted on the top of each nail. Also, this sketch is just so pretty, no?
Highlight & Harmonize
There’s no standout “hero” nail for this set, but the harmony is there with a uniform nail art design. However, the glassy cateye effect is definitely the highlight here!
The Execution
I’ll break down the step-by-step instructions on how I executed this set below, but first things first. This is a gel polish tortoiseshell nail art set. I can’t even lie… I think you could probably recreate this with nail lacquer, but it would be pretty difficult with the cateye and ombre.
Cateye/magnet effects are pretty simple for me to do now, but the technique that always trips me up is ombre. I’ve looked up a ton of different ways to achieve a seamless ombre with gel polish (tiny dabs of alcohol, pat gels, ombre brush, mixing two colors together to make the midline less noticeable, etc.). I can’t tell you which method I like the most because I haven’t mastered any of them, but for this set, I used an ombre nail art brush and swept it across the nail where the two colors met before curing. It worked well enough, but if you look really closely, there are some streaks. But who’s looking that close IRL?
Okay, okay, let’s get into the nail art design tutorial.
Nail by Nail

First up, prep: buff and etch the nails!
I etch the underside of each nail with an e-file to create a rough surface so the nails stay on for at least 2 weeks after application. I then buff the top of each nail to ensure the gel polish does not peel off.
There wasn’t much variation within this set, so each nail design was achieved in the same way. The only difference is the placement of the green and pink sections on each hand, as pictured throughout this post.
All Five Nails:
- Clear base coat, 1 coat, fully cure
- Solid green gel polish on half of nail, do not cure
- Solid pink gel polish on the other half of nail, do not cure
- Using an ombre brush, blend colors where they meet by sweeping the brush back and forth horizontally, fully cure
- Magnet gel polish all over nail, 1 coat, use magnet to create the desired pattern, fully cure
- Apply neon yellow-green jelly gel polish over the green half of the nail, do not cure
- Apply deep jelly pink gel polish over the pink half of the nail, do not cure
- Using an ombre brush, blend colors where they meet by sweeping the brush back and forth horizontally, fully cure
- Apply a thin layer of blooming gel all over nail, do not cure
- On the green half of the nail, create irregular spot-like patterns using bright green solid gel polish, do not cure
- On the pink half of the nail, create irregular spot-like patterns using bright purple solid gel polish, fully cure
- Apply light jelly green gel polish over the green half of the nail, do not cure
- Apply light jelly pink gel polish over the pink half of the nail, do not cure
- Using an ombre brush, blend colors where they meet by sweeping the brush back and forth horizontally, fully cure
- Apply a thin layer of blooming gel all over nail, do not cure
- On the green half of the nail, create irregular spot-like patterns on and near the bright green spots using dark green solid gel polish, do not cure
- On the pink half of the nail, create irregular spot-like patterns on and near the bright purple using dark purple solid gel polish, fully cure
- Clear builder gel all over nail, 1 coat, hold nail upside down for ~15 seconds, fully cure
- If the nail is a bit bumpy at this point, rub off the inhibition layer with 70% isopropyl alcohol and a lint-free wipe, and lightly file the surface of the nail to smooth it out
- Glossy top coat, 1 layer, fully cure
Here are a few more tips I think are non-negotiables:
- Always follow the curing instructions based on the safety guidelines for each specific product.
- Use an appropriate UV/LED lamp – at least 48W. Those handheld flashlight ones and tiny 1-nail-at-a-time lamps do not completely cure gel polishes.
- Wear nitrile gloves at all times when handling gel products!
Here’s a step I never skip when making homemade press-on nails:
After each set is done, even when the non-wipe top coat is fully cured, there is likely some residue left on the press-on nails. So I do the following:
- Wipe each nail with a lint-free wipe dampened with 70% isopropyl alcohol.
- Follow with a second lint-free wipe dampened with water and a drop of Dawn dish soap.
- Finish with one final wipe using 70% isopropyl alcohol to ensure any residual inhibition layer is completely removed.
This gives me peace of mind that any residual inhibition layers are completely wiped off.
The Toolkit
Now that you know how I did this set, I’ll fill you in on all of the products I used below.
I know it looks like a lot of stuff (especially in the Base & Prep list), but most of these things are items you buy just once or a couple of times a year. They’re mostly items you likely already have in your DIY Press-on Nail Starter Kit.
Base & Prep:
- Full cover gel nail tips
- Nail stands
- Adhesives to secure the tips to the stand
- Disposable pads to cover the working area
- Nail Drill/E-file
- Nail drill bits
- Nail buffer blocks
- 70% Isopropyl alcohol
- Push-top container for alcohol
- Lint-free wipes
- Clear base coat
- Clear builder gel
- Nitrile gloves
Colors:
- Solid neon green – DND 2523 Garden Games
- Neon yellow-green jelly – Gelcare Highlighter Yellow
- Bright green – DND 2524 One in a Melon
- Deep green – DND 747 Aurora Green + drop of DND 888 Master Black
- Light jelly green – Born Pretty SG-02 from this set
- Solid pink – DND 269 Pink Strive
- Neon jelly pink – Gelcare Jelly Pink
- Bright purple – PLA 106 After Dark
- Deep purple – PLA 190 You Can’t Tell Anyone
- Light pink jelly – Allure 030 from this set (I purchased this in person at Rita Nail Supply in the Bronx, NYC)
Finishes & Effects:
Tools:
Top Coat:
- Glossy Top Coat – Kokoist Ultra Glossy Top Coat
