
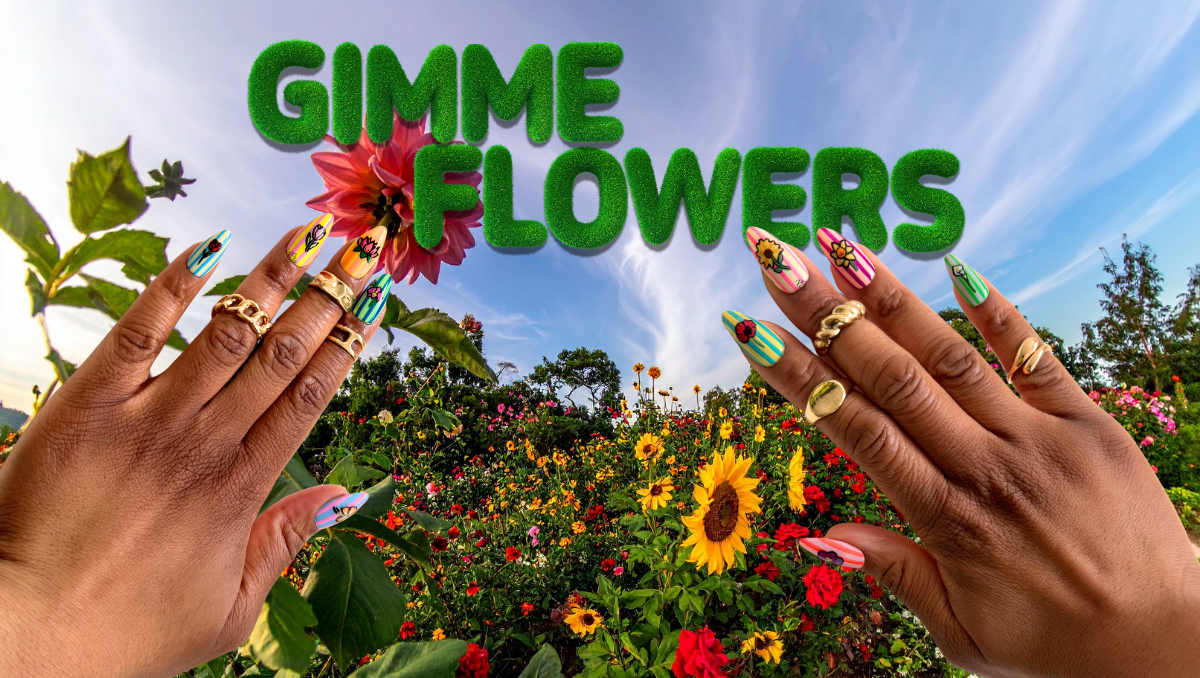
I’d love to be the type of person to keep fresh flowers in my home at all times, but I’m not, so I made a flower press-on nails instead! It’s summer, I’m still into bright nails, and a floral nail art design is a great way to infuse tons of color into a manicure. My favorite at-home DIY press-on set inspired this one, and I tried a different nail art technique, so I’m excited to share all of those details with you!

The Vision
To get all my thoughts out of my head and eventually onto my hands, I use my 6-step design process called The POLISH Method. It helps me figure out the direction I want to go in and get my ideas organized before I pull out a nail tip.
Point of View
I don’t often do flower press-on nails because I assume it takes forever to do well, but I was determined to give it a try this summer. I kept the bold color vibes going from the Watermelon Sugar set, but knew I wanted to add a bit of whimsy this time around.
Origin
I was my own inspiration this time around and essentially just copied a fruit nail art design set I did last year.


I worked really hard on that set, and I still think it’s the best set I’ve done since I started making my own press-on nails at home. My original plan was to just recreate the fruit press-on nail set and maybe change things up a tiny bit to see if I could make it even better. Instead, I decided to give myself some flowers and keep the colorful stripes as the background. Do I regret this? No, but there are some things I would’ve done differently. We’ll discuss that later in this post.
Layout
Medium-length, almond-shaped nails are my go-to, and I stuck with that for this set. However, my other two shape options, coffin and square, just didn’t fit with the whimsical vibe I was going for. I do think the stripes would’ve looked great on square nails, so I might try it another time for a different look. Stay tuned!
Inventory
Okay, so I stayed away from gems, 3D elements, textures, and magnet gel for this set, but I did use an unexpected product: Mod Podge! For this set, I made DIY nail art stickers to create the nail art based on a TikTok tutorial I saved months ago. I’ll explain more in “The Execution” section of this post, but heads up, unfortunately, I don’t think this technique was for me.
Sketch
Here’s “The Set Map” for this custom DIY press-on nail set:

I used a lot of different color gel polishes for this floral nail art set, so writing down every color was essential to keeping me organized. I didn’t bother to sketch out the flowers on The Set Map because:
- It would’ve taken me a while
- It was more important for me to have the stripe colors as a visual reference
- I didn’t know which flowers would look best on which nails until everything was already painted (especially since I created the “stickers”, so I could move flowers around until I was 100% on the placements)
Highlight & Harmonize
Each nail was its own art piece, and none stood out more than the others, but that’s what makes it cohesive. While the flowers on each nail were different and I didn’t repeat any stripe colors, all of the nails followed the same template: striped background with the flower design in the center.
The Execution
I use gel polish for every custom DIY press-on nail set I create because it doesn’t dry until cured under a UV/LED lamp, so I can wipe away any mistakes and redo designs until I’m 100% pleased with how everything looks. This didn’t 100% work out with this set because of the Mod Podge, but I promise I’ll get to that in a bit! Now, you could probably create a very similar looking set with nail lacquer, but I’ll leave that to the nail professionals. We’re beginner-friendly DIY folks over here.
Okay, now let’s talk about these Mod Podge flower “stickers”. I saw this TikTok tutorial by professional nail tech, @hippie_vibe_nails, and thought it was a genius idea. For nail techs who are extremely skilled in nail art and work with clients, creating nail art stickers ahead of client appointments is an incredible time-saving hack. I thought that maybe it would be a way for me to save some time, too, but I didn’t really think it through all the way. I was able to do a decent job with this technique (and it is an AMAZING technique) I just was not the target audience because:
- It’s for nail pros or DIYers who are confident with drawing or painting. Unlike when you paint a design directly onto a nail, when you put a gel polish design onto a Mod Podge layer, you can’t cleanly wipe away any mistakes, or else you’ll wipe away the Mod Podge layer, too. Because of this, my lines were not as neat as I like them to be.
- It actually took me much longer to complete the design. For my middle nail on my left hand, I had to remake the press-on because I used the wrong size tip. Because I was only doing one nail, I didn’t bother with the Mod Podge and just painted the design directly onto the nail. I think I got it done in a couple of minutes. When I did the same flower design on the Mod Podge, I knew I had to get it perfect on the first try, so it took twice as long.

3. I didn’t realize that the stickers wouldn’t lie flush to the nails because of the nails’ curves. When I realized this, I did bend the stickers in the middle a bit, which helped, but I still had to encapsulate the stickers with builder gel so the nails would be smooth. Even with that, you can still see the outline of Mod Podge on some of the stickers. I think my Mod Podge layer may have just been too thick.
4. I spilled the entire jar of Mod Podge onto my desk and all over my carpet. The clean-up wasn’t fun, and my rug now has a hard Mod Podge crust on it. This was entirely my bad. I didn’t screw on the lid. Oops!
If I were to try this method again, I’d only do it during times when I’m doing someone else’s natural nails and I need to move fast. Also, I’d choose simpler designs like hearts and stars, the nail art that I know I can execute quickly without mistakes.
Okay, now that I’ve explained that, let’s get into some more execution deets.
Nail by Nail

First up, prep: buff and etch the nails!
I etch the underside of each nail with an e-file to create a rough surface so the nails stay on for at least 2 weeks after application. I then buff the top of each nail to ensure the gel polish does not peel off.
For this set, I used the same design formula for each nail; the only differences are the colors and flowers. I’ll break down the step-by-step design tutorial first, then list all the colors I used for each nail in “The Toolkit” section below.
All Nails:
- Clear base coat, 1 coat, fully cure
- Solid color polish all over nail, 2 coats, fully cure between each coat
- Matte top coat, 1 thin coat, fully cure
- Paint on colored stripes, 2 coats, fully cure between each coat
- Apply pre-made gel polish “stickers”, (you may have to bend the sticker a bit in the center so it fits flush onto the nail)
- For the complete nail art sticker tutorial, watch @hippie_vibe_nails’ TikTok here
- Clear builder gel, 1 thin coat, fully cure
- Clear builder gel, 1 thicker coat, flip nail upside down for about 15 seconds to encapsulate the nail art sticker, flip the nail back right-side up and fully cure
- If you notice the nail isn’t smooth and rounded evenly after curing, use a lint-free wipe with a bit of 70% isopropyl alcohol to wipe off the inhibition layer, then file the surface of the nail to create a smooth, even surface
- Glossy top coat, 1 coat, fully cure
Here are a few more tips I think are non-negotiables:
- Always follow the curing instructions based on the safety guidelines for each specific product.
- Use an appropriate UV/LED lamp – at least 48W. Those handheld flashlight ones and tiny 1-nail-at-a-time lamps do not completely cure gel polishes.
- Wear nitrile gloves at all times when handling gel products!
Here’s a step I never skip when making homemade press-on nails:
After each set is done, even when the non-wipe top coat is fully cured, there is likely some residue left on the press-on nails. So I do the following:
- Wipe each nail with a lint-free wipe dampened with 70% isopropyl alcohol.
- Follow with a second lint-free wipe dampened with water and a drop of Dawn dish soap.
- Finish with one final wipe using 70% isopropyl alcohol to ensure any residual inhibition layer is completely removed.
This gives me peace of mind that any residual inhibition layers are completely wiped off.
The Toolkit
This section is going to be stacked because I used so many different color gel polishes for these flower press-on nails, but don’t worry, most of the other items in this section are products you buy just once or a couple times a year. They’re mostly items you likely already have in your DIY Press-on Nail Starter Kit.
Base & Prep:
- Full cover gel nail tips
- Nail stands
- Adhesives to secure the tips to the stand
- Disposable pads to cover the working area
- Nail Drill/E-file
- Nail drill bits
- Nail buffer blocks
- 70% Isopropyl alcohol
- Push-top container for alcohol
- Lint-free wipes
- Clear base coat
- Matte top coat (to layer underneath design work)
- Clear builder gel
- Nitrile gloves
Colors:
Because each nail has a different color combination, I’m going to list the colors I used on each nail.
- Right Thumb:
- Background color – Modelones 0907 (from this set)
- Stripes color – DND 715 Island Punch
- Violet Nail Sticker:
- Neon purple – DND 020 Rebecca Purple
- Purple – DND 003 Blue Violet
- Deep purple – DND 455 Plum Passion
- Yellow – DND 204 Marigold DIVA
- Right Index:
- Background color – DND 506 Summer Sun
- Stripes color – DND 669 Fierce Sapphire
- Poppy Nail Sticker:
- Red – PLA 42 The Limit Does Not Exist
- Green – Yogurt Gel #46 Summer Green (from this set)
- Right Middle:
- Background color – DND 118 Pale Kiwi DIVA
- Stripes color – Kokoist E-23 Neon Toy Pink
- Sunflower Nail Sticker:
- Deep yellow – Yogurt Gel #26 Sweet Mango (from this set)
- Bright yellow – DND 2516 Sun Rebels
- Brown – DND 053 Spice Brown
- Green – Yogurt Gel #46 Summer Green (from this set)
- Right Ring:
- Background color – DND 185 Peach Cobbler DIVA
- Stripes color – DND 020 Rebecca Purple
- Daffodil Nail Sticker:
- Yellow – DND 204 Marigold DIVA
- Orange – DND 208 Perfect Orange
- Green – Yogurt Gel #46 Summer Green (from this set)
- Right Pinky:
- Background color – DND 194 Clique-Bait DIVA
- Stripes color – DND 2523 Garden Games
- Lily Nail Sticker:
- White – PLA – 289 French White
- Pale green – DND 118 Pale Kiwi DIVA
- Bright green – DND 2524 One in a Melon
- Yellow – DND 2516 Sun Rebels
- Left Thumb:
- Background color – DND 436 Baby Blue
- Stripes color – Modelones 0730 (from this set)
- Hibiscus Nail Sticker:
- Orange – PLA-80 Going, Gone, Gondola (from this set)
- Peach – DND 185 Peach Cobbler DIVA
- Pale yellow – DND 2509 Gimme Butter
- Left Index:
- Background color – DND 2520 Area 51
- Stripes color – Maychao Neon Blue
- Orchid Nail Sticker:
- Pink – DND 228 I Have a Crush DIVA
- Yellow – DND 2518 Down With the Zest
- Green – DND 2524 One in a Melon
- Left Middle:
- Background color – PLA-79 Deal Me In
- Stripes color – DND 123 Citrus Sizzle DIVA
- Lotus Nail Sticker:
- Pink – DND 231 Blazing Berry DIVA
- Green – DND 2524 One in a Melon
- Left Ring:
- Background color – DND 2518 Down With the Zest
- Stripes color – DND 542 Lovely Lavender
- Tulip Nail Sticker:
- Light pink – Modelones 057 (from this set)
- Light Green – DND 2520 Area 51
- Left Pinky:
- Background color – DND 2509 Gimme Butter
- Stripes color – Kokoist E-37 Waikiki Sky
- Rose Nail Sticker:
- Red – PLA-109 Christmas Magic
- Green – Yogurt Gel #46 Summer Green (from this set)
All flower nail stickers are outlined in Kokoist E-2 Maxi Black.
Finishes & Effects:
- Mod Podge
- Clear acrylic sheet (used to cure nail art stickers on)
Tools
Top Coat:
