
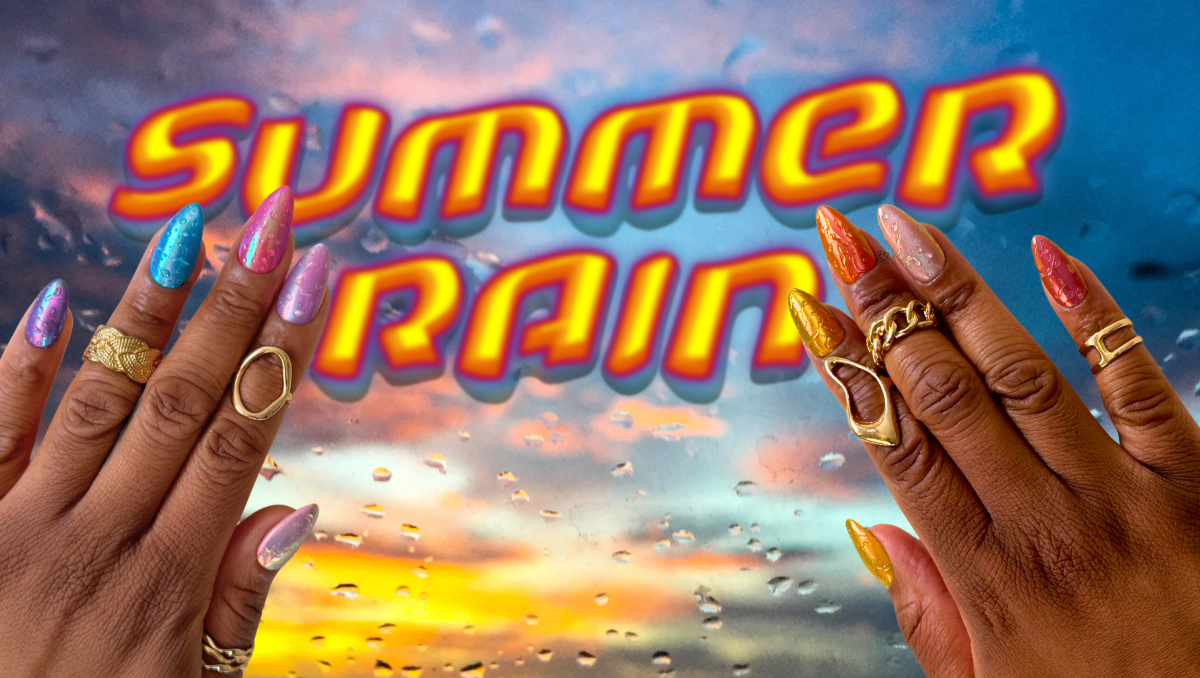
Summer is over, unfortunately, and I’m just getting around to posting these sunset ombre nails. But just because my favorite season has come to an end doesn’t mean we can’t carry the summer vibes into the fall. I truly loved this set and will likely re-do it next summer.
For now, let’s get into the steps I took to create these summer rain custom press-on nails.

The Vision
When I need to come up with a design concept for a new set of at-home nails, I rely on my 6-step design process called The POLISH Method. Using The POLISH Method helps me think through my nail art designs step-by-step so that I’m not lost in the sauce of my overactive mind.
Point of View
I like my nails’ vibes to match the season (for the most part), so I knew this set would be one of the last summery sets I’d do for a while. Usually, I lean into bright, bold, and neon colors in the summertime, but this time around, I wanted to go the more “moody vibe” route with these nails. So that was my top design note to myself – summer, but make it moody.
Origin
I love when one of my previous sets becomes the blueprint for another, and that’s exactly what happened here. I was so in love with the thumb nail art design in my “Low Hanging Fruit” press-ons that I wanted an entire set inspired by them. Additionally, one of my top 20 favorite songs of all time is “Summer Rain” by Carl Thomas. Since it rained what felt like every day in NYC this summer, that song was looping in my mind constantly, so naturally, it served as inspo.

Layout
If you know me, you can guess with about 80% accuracy that the nail shape on my hands will be medium almond. What can I say? I like what I like, but I love what I love. Almond also just made sense for this nail art design since “sunset” was the theme, the sun is round, and almond is the roundest nail shape you’ll see me in. I’m just not an oval girlie.
Inventory
There were three main design elements in this set: color story, magnet gel + chrome for effective light transition, and the 3D water droplet effect.
For the color story, I searched “what colors are in a sunset?” on Google to nail the sunset ombre effect. I found 10 colors that worked for each of my ten nails based on the gel nail polish colors I already had in my collection.
I think having a nice light transition as part of nail art is a great way to make sets more dynamic, so I used both my favorite fine particle magnet gel and ICE Gel chrome powders to achieve that effect.
The star of the show in this summer rain-inspired nail art set was the 3D water droplet effect I created using a Poke gel base coat and my go-to glossy top coat. If I could find a way to make this effect work for each and every nail set I create, I would. I couldn’t stop looking down at my nails while I had this set on!
Sketch
Here’s a look at The Set Map I created for this set:

Because this DIY custom press-on set wasn’t design-heavy, I didn’t use The Set Map template to practice or decide on design work, but it helped me map out the color story clearly. I didn’t want to use the sunset colors randomly. Being intentional about the color story was incredibly important because I wanted an overall gradient effect when looking at the set as a whole.
Highlight & Harmonize
As I mentioned in the Sketch section above, this nail art set is meant to be taken in holistically. Each nail makes sense only when viewed amongst all of the others. That’s where the harmony lies here. They’re only sunset nails because each nail is a moment in time of the entire event that is a sunset.
The Execution

Technically speaking, this was actually one of the simplest nail art design sets I’ve done to date, so let me “keep my ting brief” here. I went through the key design elements in the “Inventory” section, and I’m going to break down how I executed all of the nail art in the Nail by Nail section below. One adjustment I would make in the future is that I’d choose more distinct yellows for the lighter end of the color palette. I feel like the thumb and index finger of my right hand look so similar that you don’t get the gradient effect strongly enough at that end of the set.
Nail by Nail

First up, prep: buff and etch the nails!
I etch the underside of each nail with an e-file to create a rough surface so the nails stay on for at least 2 weeks after application. I then buff the top of each nail to ensure the gel polish does not peel off.
Besides the different color gel polishes and chrome powders used, there wasn’t much variation in this set, so each nail design was executed the same way.
All Five Nails:
- Clear base coat, 1 coat, fully cure
- Solid color polish all over nail, 2 coats, fully cure between each coat
- Magnet gel polish all over nail, 1 coat, use magnet to create desired pattern, fully cure between each coat
- Jelly color polish all over nail, 2 coats, fully cure between each coat
- Chrome top coat all over nail, 1 coat, fully cure
- Rub in chrome powder all over nail, brush away any excess powder
- Using a lint-free wipe with a little bit of 70% isopropyl alcohol on it, wipe just the border of the entire nail, just along the edge as to not disturb the chrome powder
- Clear top coat all over nail, 1 coat, fully cure
- Clear builder gel, 1 coat, fully cure
- Poke base gel all over nail, 1 coat, fully cure
- Lightly dab glossy top coat randomly all around the nail to create a patchy look, watch the polish beads move and fully cure as soon as you see your desired look
- This TikTok shows the technique in action.
Here are a few more tips I think are non-negotiables:
- Always follow the curing instructions based on the safety guidelines for each specific product.
- Use an appropriate UV/LED lamp – at least 48W. Those handheld flashlight ones and tiny 1-nail-at-a-time lamps do not completely cure gel polishes.
- Wear nitrile gloves at all times when handling gel products!
Here’s a step I never skip when making homemade press-on nails:
After each set is done, even when the non-wipe top coat is fully cured, there is likely some residue left on the press-on nails. So I do the following:
- Wipe each nail with a lint-free wipe dampened with 70% isopropyl alcohol.
- Follow with a second lint-free wipe dampened with water and a drop of Dawn dish soap.
- Finish with one final wipe using 70% isopropyl alcohol to ensure any residual inhibition layer is completely removed.
This gives me peace of mind that any residual inhibition layers are completely wiped off.
The Toolkit
Ready to recreate this sunset ombre nail look yourself? Great! Let me share all of the products I used to do it. I know it seems like I used an entire nail supply store to make this nail set, but besides the specific colors used, they’re mostly items you likely already have in your DIY Press-on Nail Starter Kit.
Base & Prep:
- Full cover gel nail tips
- Nail stands
- Adhesives to secure the tips to the stand
- Disposable pads to cover the working area
- Nail Drill/E-file
- Nail drill bits
- Nail buffer blocks
- 70% Isopropyl alcohol
- Push-top container for alcohol
- Lint-free wipes
- Clear base coat
- Matte top coat (to layer underneath design work)
- Clear builder gel
- Nitrile gloves
Colors:
- Bright yellow (right thumb): Solid yellow – DND 745 Honey, Jelly yellow – Born Pretty SG-03 from this set
- Golden amber (right index): Solid golden amber – Yogurt Gel Color #26 Sweet Mango, Jelly amber – Allure 143 from this set (I purchased this in person at Rita Nail Supply in the Bronx, NYC)
- Warm orange (right middle): Solid orange – DND 760 Russet Orange, Jelly orange – Born Pretty SG-04 from this set
- Peach (right ring): Solid peach – DND Peach Cobbler DIVA #185, Jelly peach – Allure 030 from this set (I purchased this in person at Rita Nail Supply in the Bronx, NYC)
- Coral (right pinky): Solid coral – DND 538 Princess Pink, Jelly coral – Born Pretty SG-05 from this set
- Blush pink (left thumb): Solid blush pink – Yogurt Gel Color #13 Pink Bear, Jelly pink – Gelcare Rosehip Oil
- Lavender (left index): Solid lavender – DND 542 Lovely Lavender, Jelly lavender – Major Dijit #07 from this set
- Magenta (left middle): Solid magenta – DND I Have a Crush DIVA #228, Jelly magenta – Gelcare Jelly Pink + Gelcare Jellyfish Blue
- Dusty blue (left ring): Solid dusty blue – DND 570 Blue Hill, Jelly blue – Allure 113 from this set (I purchased this in person at Rita Nail Supply in the Bronx, NYC)
- Deep purple (left pinky): Solid purple – Yogurt Gel Color #67 Violet, Jelly purple – Gelcare Cherry Jello + Gelcare Jellyfish Blue
Finishes & Effects:
- Glass-like magnet gel polish
- GW-18, GW-19, & GW-20 from this Ice Gel chrome powder set
- Glossy top coat for covering the chrome powder layer
- Poke base gel
Tools:
- Eyeshadow applicators (for rubbing in chrome powder)
- Foundation brush (for brushing away excess chrome powder)
- UV/LED lamp
Top Coat:

Leave a Reply