
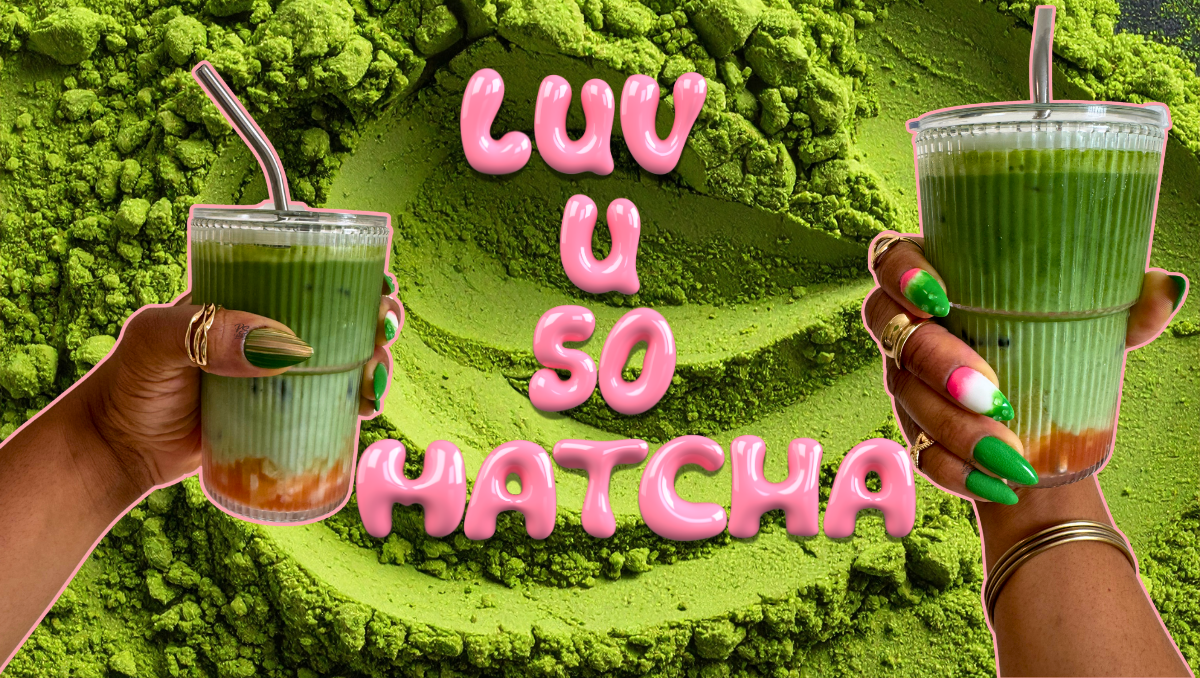
Yes, I love matcha so much that I made a matcha nail art set. I’d been thinking about this set for months because I started making guava matcha lattes at home daily. And when I say daily, I truly mean I drank a matcha latte every single day. I didn’t just hop on the matcha bandwagon; I’m true to this. I’ve been drinking matcha lattes since I was a junior in college. So as an OG matcha lover, I present to you my interpretation of a guava matcha latte on a set of DIY custom press-on nails.

The Vision
To get through designing nail art without frustrating myself, I use my 6-step design process called The POLISH Method. This method helps me think through different design elements, nail shape, colors, and techniques before I pull out a single product.
Point of View
We can kinda breeze through this section because I was set on doing a matcha nail art set. What I will say is that I knew I’d be transitioning to drinking coffee lattes soon, so I wanted to get the matcha-themed nails done while I was still drinking matcha daily.
Origin
Matcha! This spring, latte making has become one of my favorite daily rituals. I thought it would be cool to represent my love for matcha on my favorite art canvas: my nails.
Layout
I stuck with my tried-and-true medium almond nail shape for this set, but in retrospect, I wish I’d gone with a square shape to more closely mimic the cup I drink my matcha lattes out of.
Inventory
While I only used three colors in this matcha nail art set, I incorporated a few different products to add various textures. Here’s a quick rundown of the three biggest texture-adders I used:
- Clear acrylic powder for the matcha powder look
- Non-wipe jelly top coat to create the ribbed glass effect
- Solid potted nail glue to create 3D ice cubes
I’ll get into how I used each product in the Nail by Nail section below.
Sketch
Take a look at The Set Map for this set below:

I wanted this set to loosely represent the different stages of making a guava matcha latte, so sketching it out before I made any real design and technique decisions was important.
Highlight & Harmonize
Whenever I describe the elements that make my DIY press-on nail sets cohesive, I usually cite a particular technique, but this time around it’s one color: green! Green is my favorite color, and I really have to stop myself from using it in every set. One of the things matcha lovers look for in a good-quality matcha is a vibrant green color and I hunted for the perfect green for this set. I’ve actually been on the hunt for a good matcha green gel polish for quite a while. I’m so glad I found DND’s Kiss the Prince because it was the perfect green (in my opinion).
The Execution

Long story, kinda short: I had trouble blending the three colored layers on the index and middle nails.
At first, I thought I could accomplish a nice blend by just using an ombre brush on the gel polish before curing, but it looked sloppy. I decided to pull out some blooming gel to help create a soft, marbled blend, and it was the fix I needed to achieve the look. You didn’t see this pivot reflected in The Set Map because I had to change gears while my gloves were on and the polishes were already out!
Nail by Nail: Matcha Nail Art Tutorial

First up, prep: buff and etch the nails!
I etch the underside of each nail with an e-file to create a rough surface so the nails stay on for at least 2 weeks after application. I then buff the top of each nail to ensure the gel polish does not peel off.
For this set, both hands mostly mirror each other (the middle fingers are the exception), but each individual finger has its own design.
Thumb (finished, mixed matcha latte in glass):
- Clear base coat, 1 coat, fully cure
- Solid green gel polish, 2 coats, fully cure between each coat
- Magnet gel polish all over the nail, 1 coat, use magnet to create desired pattern, fully cure
- Clear builder gel, 1 coat, fully cure
- Thin matte top coat, 1 coat, fully cure
- Using a long, thin liner brush, paint straight, vertical lines of jelly non-wipe top coat on the nail (work side to side across the nail), flash cure for ~5-10 seconds after each line, fully cure once all lines are painted on
Index (finished matcha latte, not yet mixed):
- Clear base coat, 1 coat, fully cure
- Solid green gel polish, 2 coats, fully cure between each coat
- Two-thirds of the way down from the tip of the nail, paint ~10% of the nail with solid white gel polish; below the white, paint the remaining 30% of the nail with pink gel polish; do not cure between each color; fully cure once all colors have been painted on
- Apply a thin coat of blooming gel all over the nail, do not cure
- Apply a thin layer of green gel polish over the blooming gel and then, using a thin liner brush, drag some of the green gel polish into the white area to create the swirl effect; do not cure
- Repeat step 5, but with the pink gel polish, fully cure
- Clear builder gel, 1 coat, fully cure
- With a small metal scoop*, pick up tiny pieces of solid nail glue and place them sporadically at the tip of the nail; using a nail art sculpture pen, mold all of the solid glue pieces into cube-like shapes, fully cure
- Glossy top coat, 1 coat, fully cure
*The tiny scoop I use is the wide, curved end of a metal cuticle pusher.
Middle (matcha added to latte):
- Clear base coat, 1 coat, fully cure
- Solid white gel polish, 2 coats, fully cure between each coat
- Paint the top ~10% of the nail with solid green gel polish; paint the bottom 30% of the nail with pink gel polish; do not cure between each color; fully cure once all colors have been painted on
- Apply a thin coat of blooming gel all over the nail, do not cure
- Apply a thin layer of green gel polish over the cured gel polish and then using a thin liner brush, drag some of the green gel polish into the white area to create the swirl effect, do not cure
- Repeat step 5, but with the pink gel polish, fully cure
- Clear builder gel, 1 coat, fully cure
- With a small metal scoop, pick up tiny pieces of solid nail glue and place them sporadically at the tip of the nail; using a nail art sculpture pen, mold all of the solid glue pieces into cube-like shapes, fully cure
- Glossy top coat, 1 coat, fully cure
Ring (matcha microfoam):
- Clear base coat, 1 coat, fully cure
- Solid green gel polish, 1 coat, fully cure
- Solid green gel polish, 1 coat, do not cure
- In a small cup, add some dish soap to a bit of water and stir it up to create lots of foam. Using a small metal scoop, scoop out a bit of the foam and lightly place foam all over the uncured gel polish. Flash cure with a handheld UV/LED light to keep the texture in place.
- Note: You’ll need to work fast with the foam because it pops and flattens rather quickly.
- Clear builder gel, 1 coat, fully cure
- Glossy top coat, 1 coat, fully cure
Pinky (matcha powder):
- Clear base coat, 1 coat, fully cure
- Clear builder gel, 1 coat, fully cure
- Solid green gel polish, 1 coat, fully cure
- Solid green gel polish, 1 coat, do not cure
- Using a small scoop, sprinkle clear acrylic powder all over the nail until the green gel polish no longer looks shiny, fully cure,
The Toolkit
Now it’s time for you to try this matcha nail art set for yourself! Below is a list of all of the products I used to create this set. Don’t get overwhelmed by the number of items in this list. Most of the products listed are items you likely already have in your DIY Press-on Nail Starter Kit.
Base & Prep:
- Full cover gel nail tips
- Nail stands
- Adhesives to secure the tips to the stand
- Disposable pads to cover the working area
- Nail Drill/E-file
- Nail drill bits
- Nail buffer blocks
- 70% Isopropyl alcohol
- Push-top container for alcohol
- Lint-free wipes
- Clear base coat
- Clear builder gel
- Nitrile gloves
Colors:
- Green – DND 276 Kiss the Prince DIVA
- White – Yogurt Gel Color Grocery #02 Light Ivory
- Pink – PLA-154 Make it Rain
Finishes & Effects:
Tools:
- Liner brushes
- Metal cuticle pusher
- UV/LED lamp
- Magnet for cateye gel polish
- Nail art sculpture pen
- Handheld Flash Cure Nail Lamp
Top Coat:
- Glossy top coat – Kokoist Ultra Glossy Non Wipe Top Coat Gel
- Matte top coat – Yogurt Nail Kr. Cotton Matt Top Gel
- Kokoist Non Wipe Jelly Top Coat Gel

Leave a Reply